Showing posts with label SAP diagnostics agent. Show all posts

9/28/2017

SAP Uninstallation of SMD Agent Using SWPM SP04

Переход к началу метаданных
In Installation of SMD Agent With SWPM SP04  we have seen how to carry out Installation of SMD Agent . Here we will see how to uninstall that using SWPM. You must delete a Diagnostics Agent instance only using SAPINST comes with SWPM  otherwise you might have problems with further installations on this host.  Before you go ahead with the removal of SMD Agent please make sure you have refre to the Section 4 of this SAP Note : 1833501  and Rule no # 6 of the attached document Agent Installation Strategy from SAP Note : 1365123

Rule No: 6 of SAP Note attched document 1365123

To remove a Diagnostics Agent instance installed for a specific hostname you must remove the JVM parameters described in the Introscope Setup Guide, which is available at service.sap.com/instguides.
Finally restart the Java Managed system to no longer run the Introscope Byte Code Agent
– The Managed System JVM parameters (to be removed) show that the Introscope Byte Code Adapter
executed inside the Managed System uses files from Diagnostics Agent directory structure: 
Xbootclasspath/p:D:/usr/sap/DAA/SMDA77/SMDAgent/applications.config/com.sap.smd.agent.application.wily/BytecodeAgent/ISAGENT.8.2.3.5-2011-01-
14/wily/connectors/AutoProbeConnector.jar;D:/usr/sap/DAA/SMDA77/SMDAgent/applications.config/com.sap.smd.agent.application.wily/BytecodeAgent/ISAGENT.8.2.
3.5-2011-01-14/wily/Agent.jar
Section 4 of SAP Note : 1833501
Make sure to respect the section(s) dealing with "Uninstalling Introscope Agents" here [http://wiki.sdn.sap.com/wiki/x/kgELE].
SAP Note 1259982 documents "Deleting a Diagnostics Agent Manually" for UNIX Operating Systems.
--------------------------------------------------------------------------------------------------------------------------------------------------------------------------------------------------------------------------------------
following above instruction  here below is the test case with steps , how would uninstall SMD Agent.

SWPM

SAP SMDA diagnostic agent

SAP inst  SWMP diagnostics gent uninstall

SAP inst  SWMP diagnostics gent uninstall

SAP inst  SWMP diagnostics gent uninstall

SAP inst  SWMP diagnostics gent uninstall

SAP inst  SWMP diagnostics gent uninstall

Note : If you have register this agent to any SLD then it is also advisable to remove the agent detail from SLD using remove button on this below SLD screen.

SAP diagnostics agents

Diagnostics Agents

Skip to end of metadata

Installation

General Information

Following documents are most relevant for installing and working with the Diagnostics Agent:
  • Refer to SAP Note 1365123 for the Diagnostics Agent installation strategy. 
  • Refer to SAP Note 1833501 for information on Diagnostics Agent installer versions, and for an overview of SAP Notes related to Mass Deployment / Unattended Installation.
  • Refer to SAP Note 1858920 and the latest Installation and Setup Guide for:
    • Information on how to access the Product Availability Matrix (PAM) for the Diagnostics Agent
    • Instructions on how to download the Installation Media
    • Instructions on how to patch the Installation Media
    • Details on supported kernels
    • Description of the unattended/silent installation mechanism
    • SMD Setup Script (smdsetup.bat/smdsetup.sh) documentation
    • More detailed installation instructions

Download Paths

Artifacts required for Diagnostics Agent installations can be downloaded as follows (for detailed instructions and alternative paths refer to latest Diagnostics Agent Installation and Setup Guides):
  • Go to http://support.sap.com/sltoolset
    • Product Availability Matrix/PAM:  search for "Product Availability Matrix"
    • Documentation:  System Provisioning  →  System Provisioning Scenarios →  Install a System using System Provisioning Manager →  Installation Option of Software Provisioning Manager 1.0 → Installation Guides - Standalone Engines and Clients → Diagnostics Agent  → download the guide for your  "Operating System Platform"
    • "installer":  System Provisioning → Download Software Provisioning Manager → SOFTWARE PROVISIONING MGR 1.0 → DOWNLOADS → → SWPM10SP*.SAR
  • For download of individual archives go to SAP Note 2253383
  • Check SAP Note 1858920 and the Product Availability Matrix for supported kernel versions

Recommended Reading

Which agent version should be used?

Please refer to the above mentioned Diagnostics Agent Installation Strategy SAP Note.

Where to install an agent?

Please refer to the above mentioned Diagnostics Agent Installation Strategy SAP Note.

Where to download the agent installation files?

Please refer to the General Information section above.

Connection Configuration

Refer to the installation procedures contained inside the Diagnostics Setup Guide.

Connection options

Before starting the installation make sure that you have identified which installation strategy you want to use. This means that you need to choose between the two following scenarios:
  • Direct Solution Manager Registration: In this scenario, the Diagnostics Agent establishes a direct connection to the Solution Manager system. Using this type of connection no SLD attachment is necessary especially since Solution Manager 7.1 SP05. Operational issues concerning Diagnostics Agents to Solution Manager connectivity can now be easily resolved via the “Non-authenticated Agents” list. (See Non Authenticated Diagnostics Agents).
    Prerequisite: Diagnostics Agent was connected to a Solution Manager 7.1 SP05 system at least once.
  • SLD Registration: In this scenario, the Diagnostics Agent registers itself into the production SLD assigned to the managed system on which the Diagnostics Agent will be installed. This scenario should be used especially if Solution Manager is not yet installed.

SLD Registration - Remotely Connect DIagnostics Agents  - Solution Manager 7.1

If you choose the "SLD Registration" strategy, the Diagnostics Agent should be visible using SOLMAN_SETUP transaction -> System preparation -> Step "Connect Agents". You must connect the relevant Diagnostics Agents to the current Solution Manager system in order to later be able to use them.
Agent reconnection may require waiting several minutes. It depends on settings which are set on the SMD Agent side. As soon as it detects that the association has been changed the SLD state is updated and the registration should proceed.

Direct Solution Manager Registration

If you want to perform the "Direct Solution Manager Registration" after the installation of the Diagnostics Agent, you will need to perform the smdsetup script action managingconf.
You can perform the direct connection to the solution manager in two ways, using the J2EE Message Server HTTP port (recommended). For more information about the smdsetup script refer to the Diagnostics Agent setup guide attached to the SAP Note for the most recent installer release (see SAP Note 1833501).
Example:
  • Connection by Message Server:
smdsetup managingconf hostname:"sapms://" port:"" [optional user:"<...>" pwd:"<...>"]
To run these script we will need to following information:
  1. Full qualified solution manager hostname.
  2. J2EE Message Server HTTP Port, like 81.
  3. Diagnostics Agent system user: For more information about these user check the User Administration Guide.
  4. Diagnostics Agent system user password.
Where to find the J2EE Message Server HTTP port.
  • J2EE Message Server HTTP: This port is usually 81XX (where xx is the SCS instance number: /usr/sap//SCS).
Make sure that you address the Solution Manager Java SCS Message Server with the above mentioned port number. URL.  Enter in the following URL: http://:/msgserver/text/logon
This shall display a P4 and/or P4S line, like here:


Having all necessary information, you have to perform the smdsetup script to connect the Diagnostics Agent to the Solution Manager system:
   1. Open a prompt command and navigate to the script folder inside of the agent path: usr/sap//SMDAXX/script
   2. Run the smdsetup script as the following examples:
  • Connection by Message Server:
     - smdsetup managingconf hostname:"sapms://solman.full.qual.host.name" port:"81XX" user:"SMD_ADMIN" pwd:"XXXXXXXX"
  •  Afterwards, the command should finish successfully:
Then check at the “Agent Administration” if the agent is connected to the Solution manager. If the agent does not connect to the Solman system check the SMDSystem log for error. This log file can be found into the log folder at the agent path.
IMPORTANT: Note that SAP recommends to use the connection via the Solution Manager Java SCS Message Server. Trying out a direct connection via the P4 or P4S port, is only relevant in some very specific situations.

Connect the Diagnostics Agent to Solution Manager Using SSL 

How to Configure the Different Ciphers on the Diagnostic Agent

Please refer to SAP Note 2849162.

Frequently Asked Questions and Trouble Shooting

Please refer to the FAQ Diagnostics Agent.

9/02/2017

SAP Basis Upgrade Kernel Patching

Step by step how to upgrade and patch SAP Kernel.
Kernel is an executable program that exists between SAP Applications and Operating System. It consists of executable program under the path — "/sapmnt/<SID>/exe" for UNIX and \usr\sap\SID\SYS\exe\run Windows. It starts and stops application services such as message server, dispatcher, etc.
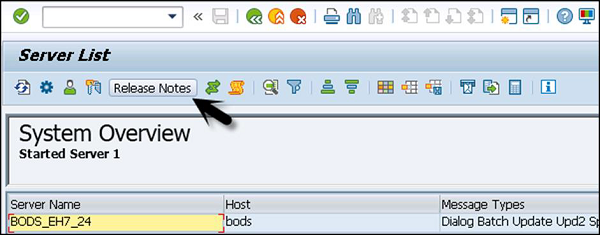
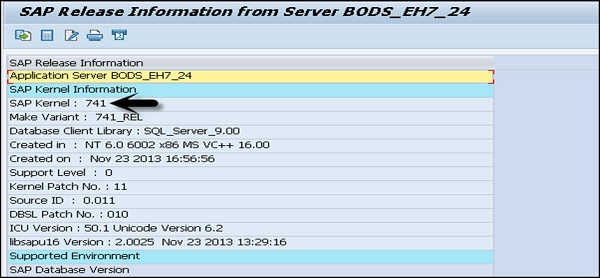
In Kernel upgrade, new .exec files replace old executable files in SAP system. To check the current version, use transaction code — SM51 > Go to Release Notes.
Server ListSAP Information
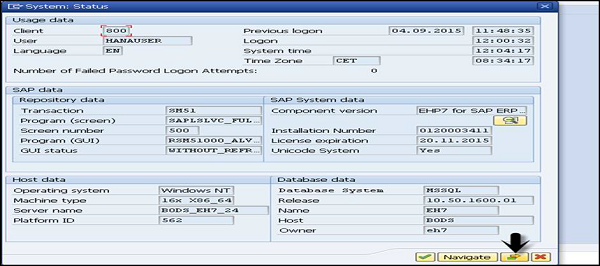
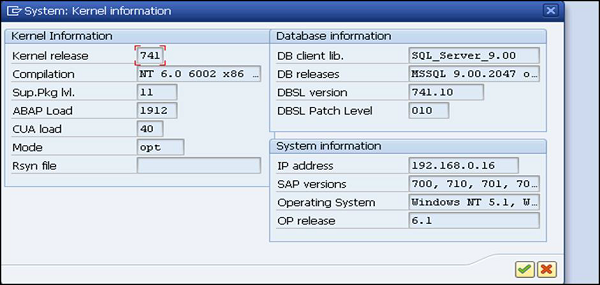
To check the status, go to System → Status tab → Other Kernel info
SAP StatusSystem StatusKernel Information
In UNIX, use disp+work − version to see information on the current Kernel version.
Follow these steps to download Kernel from SAP Market Place −
Step 1 − Open URL — https:\\service.sap.com and login with SID and password.
Step 2 − Go to SAP Support Portal from dropdown → Software Downloads.
SAP BusinessesSAP Support Portal
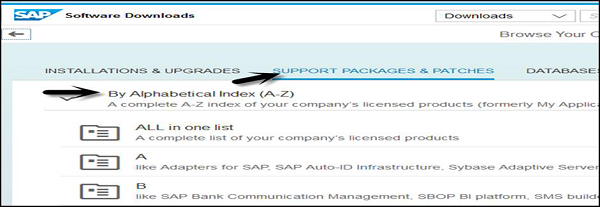
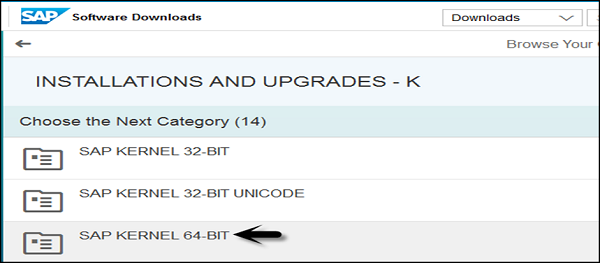
Step 3 − Go to Support Packages and patches under software downloads. Go to Software Downloads.
PatchesSAP Software DownloadsSAP Kernel 64-BIT
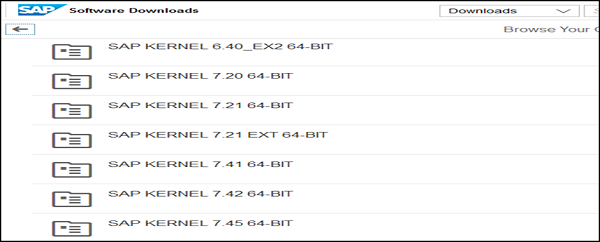
All Kernel Versions are available in 64-bit −
SAP Software
Step 4 − Select the Kernel version and download the files as per the Operating System – Windows, Linux, Solaris, AIX, and HP-UX.
Kernel Versions

Upgrade Kernel Version

Let us now follow these steps to upgrade the Kernel version −
Step 1 − Create a directory with enough disk space and enter the name of directory.
Step 2 − Copy the upgrade files SAPEXEDB.SAR & SAPEXE.SAR files to the new directory at OS level.
Step 3 − To check directory, use 'pwd' to ensure you are in the same directory.
STep 4 − Now, uncompress .SAR files by sapcar exe.
SAPCAR –xvf sapexe.SAR
SAPCAR –xvf sapexedb.SAR
SAPCAR
Step 5 − To take backup of existing Kernel, you have to create one more directory with the name "exe_old<ddmmyy>" and take backup of existing Kernel file.
Step 6 − To perform upgrade, stop the SAP application. You don’t need to shut down the database for Kernel upgrade but you need to stop the SAP application using this command — stopsap r3.
Step 7 − Copy the files from the new kernel directory exe_new<ddmmyy → to the existing kernel directory exe.
Step 8 − Use this command to copy — cp -rp /sapmnt/<SID>/exe_new<ddmmyy>/* /sapmnt/<SID>/exe/
Step 9 − Now if you check the current Kernel version using disp+work, then check the kernel version from OS level by the command disp+work − versions and new patch version should be displayed.
Step 10 − Login to the operating system as root specific to UNIX. Execute the script in Kernel directory — ./saproot.sh <SID>
You use this to assign correct permissions to all the executable programs in the kernel such as br* file etc.
Step 11 − Start SAP Applications using this command — startsap r3.
Step 12 − If you run Transaction SM52, you can see current kernel version level.

10/15/2012

SAP diagnostics agents

The diagnostics agent is a central component of the SAP Solution Manager system landscape. This page summarizes all relevant information on the agent and provides detail information on all relevant topics.
Installation

General Information

Following documents are most relevant for installing and working with the Diagnostics Agent:
  • Refer to SAP Note 1365123 for the Diagnostics Agent installation strategy. 
  • Refer to SAP Note 1833501 for information on Diagnostics Agent installer versions, and for an overview of SAP Notes related to Mass Deployment / Unattended Installation.
  • Refer to SAP Note 1858920 and the latest Installation and Setup Guide for:
    • Information on how to access the Product Availability Matrix (PAM) for the Diagnostics Agent
    • Instructions on how to download the Installation Media
    • Instructions on how to patch the Installation Media
    • Details on supported kernels
    • Description of the unattended/silent installation mechanism
    • SMD Setup Script (smdsetup.bat/smdsetup.sh) documentation
    • More detailed installation instructions

Download Paths

Artifacts required for Diagnostics Agent installations can be downloaded as follows (for detailed instructions and alternative paths refer to latest Diagnostics Agent Installation and Setup Guides):
  • Go to http://support.sap.com/sltoolset
    • Product Availability Matrix/PAM:  search for "Product Availability Matrix"
    • Documentation:  System Provisioning  →  System Provisioning Scenarios →  Install a System using System Provisioning Manager →  Installation Option of Software Provisioning Manager 1.0 → Installation Guides - Standalone Engines and Clients → Diagnostics Agent  → download the guide for your  "Operating System Platform"
    • "installer":  System Provisioning → Download Software Provisioning Manager → SOFTWARE PROVISIONING MGR 1.0 → DOWNLOADS → → SWPM10SP*.SAR
  • For download of individual archives go to SAP Note 2253383
  • Check SAP Note 1858920 and the Product Availability Matrix for supported kernel versions

Recommended Reading

Which agent version should be used?

Please refer to the above mentioned Diagnostics Agent Installation Strategy SAP Note.

Where to install an agent?

Please refer to the above mentioned Diagnostics Agent Installation Strategy SAP Note.

Where to download the agent installation files?

Please refer to the General Information section above.

Connection Configuration

Refer to the installation procedures contained inside the Diagnostics Setup Guide.

Connection options

Before starting the installation make sure that you have identified which installation strategy you want to use. This means that you need to choose between the two following scenarios:
  • Direct Solution Manager Registration: In this scenario, the Diagnostics Agent establishes a direct connection to the Solution Manager system. Using this type of connection no SLD attachment is necessary especially since Solution Manager 7.1 SP05. Operational issues concerning Diagnostics Agents to Solution Manager connectivity can now be easily resolved via the “Non-authenticated Agents” list. (See Non Authenticated Diagnostics Agents).
    Prerequisite: Diagnostics Agent was connected to a Solution Manager 7.1 SP05 system at least once.
  • SLD Registration: In this scenario, the Diagnostics Agent registers itself into the production SLD assigned to the managed system on which the Diagnostics Agent will be installed. This scenario should be used especially if Solution Manager is not yet installed.

SLD Registration - Remotely Connect DIagnostics Agents  - Solution Manager 7.1

If you choose the "SLD Registration" strategy, the Diagnostics Agent should be visible using SOLMAN_SETUP transaction -> System preparation -> Step "Connect Agents". You must connect the relevant Diagnostics Agents to the current Solution Manager system in order to later be able to use them.
Agent reconnection may require waiting several minutes. It depends on settings which are set on the SMD Agent side. As soon as it detects that the association has been changed the SLD state is updated and the registration should proceed.

Direct Solution Manager Registration

If you want to perform the "Direct Solution Manager Registration" after the installation of the Diagnostics Agent, you will need to perform the smdsetup script action managingconf.
You can perform the direct connection to the solution manager in two ways, using the J2EE Message Server HTTP port (recommended). For more information about the smdsetup script refer to the Diagnostics Agent setup guide attached to the SAP Note for the most recent installer release (see SAP Note 1833501).
Example:
  • Connection by Message Server:
smdsetup managingconf hostname:"sapms://" port:"" [optional user:"<...>" pwd:"<...>"]
To run these script we will need to following information:
  1. Full qualified solution manager hostname.
  2. J2EE Message Server HTTP Port, like 81.
  3. Diagnostics Agent system user: For more information about these user check the User Administration Guide.
  4. Diagnostics Agent system user password.
Where to find the J2EE Message Server HTTP port.
  • J2EE Message Server HTTP: This port is usually 81XX (where xx is the SCS instance number: /usr/sap//SCS).
Make sure that you address the Solution Manager Java SCS Message Server with the above mentioned port number. URL.  Enter in the following URL: http://:/msgserver/text/logon
This shall display a P4 and/or P4S line, like here:


Having all necessary information, you have to perform the smdsetup script to connect the Diagnostics Agent to the Solution Manager system:
   1. Open a prompt command and navigate to the script folder inside of the agent path: usr/sap//SMDAXX/script
   2. Run the smdsetup script as the following examples:
  • Connection by Message Server:
     - smdsetup managingconf hostname:"sapms://solman.full.qual.host.name" port:"81XX" user:"SMD_ADMIN" pwd:"XXXXXXXX"
  •  Afterwards, the command should finish successfully:
Then check at the “Agent Administration” if the agent is connected to the Solution manager. If the agent does not connect to the Solman system check the SMDSystem log for error. This log file can be found into the log folder at the agent path.
IMPORTANT: Note that SAP recommends to use the connection via the Solution Manager Java SCS Message Server. Trying out a direct connection via the P4 or P4S port, is only relevant in some very specific situations.

Connect the Diagnostics Agent to Solution Manager Using SSL 

How to Configure the Different Ciphers on the Diagnostic Agent

Please refer to SAP Note 2849162.

Frequently Asked Questions and Trouble Shooting

Please refer to the FAQ Diagnostics Agent.

Popular Posts