Showing posts with label sapr3. Show all posts

9/06/2017

SAP update system using Software Update Manager 1.0


When the SAP system was large simple when there was only part of the ABAP 
system, and the words "Java" and "SAP" and no one thought to pronounce
together, the administrator updates the system gradually, slowly, savoring
each step:
  1. First, updated utility SPAM/SAINTThis transaction is used for SPAM.
  2. Then updated the kernel- SAP Kernel
  3. If you need to install/update the Add-ons (add-on) then used transaction
    SAINT.
  4. Well, in the end, using transaction SPAM queue drew out for packs of one
    or the other system
  5. components, and produced imports.
When in the ABAP system has become more of a component, SAP began to
produce 
(1-2 times in half a year) or packs stacks Support Package Stack (SPS).
This is a set of packages support or rather, recommendations on updating
of all components of the system with the recommended level of the SAP Kernel.
This mechanism has facilitated the downloading, installation and package
tracking support for all components of the system while providing a guarantee
operation of the system after the upgrade.

When JAVA appeared part of the system, update it just fell on the shoulders
of the administrator. 
Originally, it was used for this purpose utility JSPM.

This example updates the systems based on SAP NetWeaver 7.0 (ABAP + JAVA) 

At the moment there is utility Software Update Manager SAP or just SUM.

One of the purposes of SUM is updated ABAP and JAVA stack system.
And if the ABAP system can be updated-the old fashioned way, through
transaction SPAM/SAINT update, JAVA stack system using JSPM already is
strongly discouraged. Only The SUM.

To download the SUM utility 1.0 , you must log on to the SAP Support Portal
at the link http://service.sap.com/sltoolsetthere to link the Software Logistics
Toolset 1.0 "and" General
Information "section to download the latest version (fig. 1).

Figure. 1. Software Update utility Download Manager.


The documentation for the utility is available in the section "Documentation
→ System → Maintenance Updating SAP Systems Using Software Update
Manager 1.0 SP14. When downloading, you must select the desired platform
(operating system and database) (fig. 2).

Figure. 2. Download the documentation for the Software Update Manager.


Download utilities, as usual, via the SAP Download Manager.

To install or update (if an older version of) utility Software Update Manager
.0, you must unzip the downloaded archive into a directory of
SAR \usr\sap\ <SAPSID> \SUM, running the command type
(example, MS Windows):
> SAPCAR-xvf <SUM_archive>. SAR-R \usr\sap\ <SAPSID>
Note the big utility and decompression time decent. :)
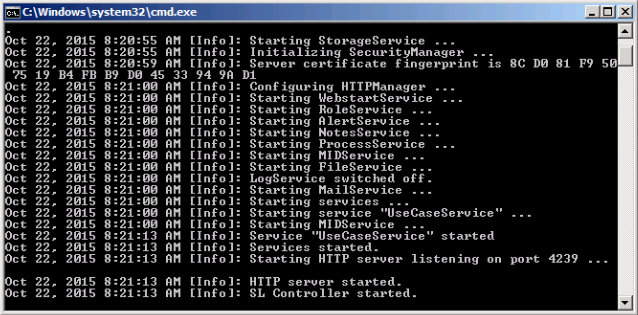
The launch takes place on the server side and client side The backend is 
activated through the launch of under User Administrator (for MS Windows)
executable file "\usr\sap\ <SAPSID> \SUM\STARTUP. BAT ' 
 (fig. 3).
SUM
Figure. 3. start the server side of the SUM utility 1.0.


The client part is a Java application (fig. 4) that runs through your browser,
the URL resembles the following:
http://<server_host>: 4329
Figure. 4. screen Sample SUM utility 1.0.


Basic requirements: because Software Update Manager uses SAP for Host Agent,
you must manually update. Details can be found here all part of the SAP system
must be running.

Useful SAP notes utility: 
SAP note # 2084104-Central Note-Software Update Manager 1.0 SP14,
SAP note # 2115547-Oracle: Add. Information-Software Update Manager1.0

My feelings from using conflicting utility. I like old soldiers, not knowing
the words love, love to oversee all stages of the process. As for here, indeed,
the work of the utility is going the same as and when on-steupdate.
The only innovation: creating clone a tablespace with programs (PSAPSR3XXX)
and import updates in it, and then switch to it as primary.
Thus, reduced downtime (down-time) system, but grow requirements
on your hard disk.

SAP Diagnostics Agent Maintenance Procedures

Diagnostics Agent Installations

Finding Previously Installed Diagnostics Agents

To double check, if a Diagnostics Agent is installed you should have a look at all existing / installed SAP systems that are operational at (logical) host level.
The Diagnostics Agents are in general identifiable by a System ID, as follows:
  • For agents shipped with / for SAP NetWeaver 7.1 EhP1 and higher, the Diagnostics Agent System ID is usually: DA? (DAA, DAB, etc.)
  • For agents based on older versions, the Diagnostics Agent System ID is usually: SMD

Diagnostics Agent Installer

Use the latest SWPM 1.0 Support Package (and associated Patch Level), when installing a new or an additional Diagnostics Agent. See SAP note 1833501 for the latest Diagnostics Agent Installation & Setup Guide.

SAP NetWeaver System Rename

SWPM based System Rename is not supported for the Diagnostics Agent. Instead, the below described Diagnostics Agent Replacement procedure must be used.

SAP NetWeaver System Copy

SWPM based System Copy is not supported and not relevant for the Diagnostics Agent. Instead, perform a fresh Diagnostics Agent installation on the target system.

Have Up-To-Date SAP Host Agents

Checking the SAP Host Agent Version

  • Solution Manager 7.1 currently requires having at least SAP Host Agents 7.20 SP147 in the Managed system landscape.
  • However, when using Solution Manager 7.1 SP10 or higher and Agents On-the-fly, deploy SAP Host Agents 7.20 SP163, at least on High Available/Fail-Over hosts. With this version, the logical hostname switches are detected faster.
  • Consider using the SAP Host Agents 7.20 SP179, in case you encounter errors related to the connectivity with the SAP Host Agent. See also: SAP Host Agent troubleshooting.
  • Further below you find more details, including hints to find out the version of existing SAP Host Agents or how to upgrade a SAP Host Agent.

Installing SAP Host Agent

  • Install one SAP Host Agent, per physical host, if not yet installed. See SAP note 1031096.

Upgrading SAP Host Agent

  • Upgrading the SAP Host Agent according to SAP note 1031096, if the version is not sufficient
    • Check the version at OS level (search in the output for "SAPHOSTAGENT information"):
      • For Windows: "%ProgramFiles%"\SAP\hostctrl\exe\saphostctrl -function ExecuteOperation -name versioninfo
      • For Unix: /usr/sap/hostctrl/exe/saphostctrl -function ExecuteOperation -name versioninfo
    • The currently installed SAP Host Agent version is also visible under the host details, if “Managed System Configuration” has been performed with solman_setup
      • Navigate to Solution Manager Administration work center → Landscape → Hosts → <search for your host> → Host Operations → <expand "More Details" section> → Status
  • Implement automatic upgrade process (especially if you plan SAP Host Agent related changes)
    • SAP note 1473974 describes ways to centrally and automatically upgrade running SAP Host Agents

Diagnostics Agent Upgrade

  • There is no need to upgrade Diagnostics Agents (business logic) explicitly.
  • Diagnostics Agents update their business logic (coding) from the SAP Solution Manager system to which they are connected. All connected Diagnostics Agents that are running in the landscape, are centrally patched, when deploying an LM-SERVICE Java Software Component Archive (SCA) on the SAP Solution Manager system.
    • Diagnostics Agents installed with Software Provisioning Manager 1.0 SP3, SP4, SP5 and SP6, initially have a version like 7.10.8.xxxxxx
    • When connecting to a SAP Solution Manager system 7.10 SP5, the freshly installed agent will downgrade to a version like 7.10.5.xxxxxx
    • When connecting to a SAP Solution Manager system 7.10 SP10, the freshly installed agent will upgrade to a version like 7.10.10.xxxxxx
  • Diagnostics Agent installation SAP notes document procedures to resolve known issues. Alternatively, you can use the below Diagnostics Agent Replacement procedure.
SAP Solution Manager 7.2:
  • Diagnostics Agents which were previously connected against a SAP Solution Manager 7.1 system, and which have been migrated/reconnected to a SAP Solution Manager 7.2 system, will also automatically update their business logic (coding) from the SAP Solution Manager system to which they are connected.
 Diagnostics Agent Kernel Patch
If you have problems with the SAP Kernel which is used by the Diagostics Agent, you may need to apply a SAP Kernel patch for the Diagnostics Agent. The procedure for Linux/Unix and for Windows is described in SAP note 2147092.

Diagnostics Agent Kernel Upgrade

In rare cases, you may be asked to upgrade the SAP Kernel used by the Diagnostics Agent (see SAP note 1707141).
The same can be achieved, by applying the below Diagnostics Agent Replacement procedure.

Diagnostics Agent JVM Upgrade

In rare cases, you may be asked to upgrade the SAP JVM used by the Diagnostics Agent (see SAP note 1774669).
The same can be achieved, by applying the below Diagnostics Agent Replacement procedure.

Diagnostics Agent Replacement

To replace a Diagnostics Agent, install a new Diagnostics Agent, and uninstall the previous Diagnostics Agent. This procedure can be relevant in the following scenarios:
  • Replace a Diagnostics Agent, which has problems that cannot be easily resolved.
  • “Upgrade” a Diagnostics Agent system, e.g.
    • install a new Diagnostics Agent using a newer installer and a newer kernel, and get a Diagnostics Agent that has a new SAP JVM and a new SAP Kernel.
    • uninstall the previous Diagnostics Agent
Follow the following procedure:
  • Reset server name
    • Login to the SAP Solution Manager system to which the agent to be replaced is connected
    • Navigate to the Agent Administration and note the server name of the previous Diagnostics Agent
    • Reset the server name using the context menu of the Diagnostics Agent
    • Stop the Diagnostics Agent
  • Install new Diagnostics Agent using a different SID
  • Assign the same server name to the new Diagnostics Agent, using the smdsetup script.
    • For smdsetup script usage, see the latest Diagnostics Agent Installation & Setup Guide, accessible via SAP note 1833501.
    • Java based Managed Systems require important additional actions(see next section)
  • Uninstall the previous Diagnostics Agent using SWPM.
This procedure will:
  • Provide you with a newly installed Diagnostics Agent
  • The Diagnostics Agent SAP Kernel will have been upgraded to the version that you have provided
  • The Diagnostics Agent SAP JVM will have been upgraded to the version that you have provided via the SAP Kernel media
  • The SAP Host Agent on your system will have been upgraded to a more recent version if a more recent version was provided via the SAP Kernel media

Diagnostics Agent Replacement in the context of a Java Managed System

This procedure updates the Managed System JVM parameters so that the Introscope Byte Code Adapter binaries are no longer taken from the previous Diagnostics Agent directory structure.
  • In case the “Deploy Byte Code Adapter under Managed System Instance(s)” option was not used in the past (before 7.1 SP12 this option was called "Ensure HA virtualization compatibility"):
      • Again configure the Wily Introscope Agent (Byte Code Adapter Installation) via transaction solman_setup → Managed System Configuration → Configure Automatically
          • Pre-requisite since Solution Manager 7.1 SP05:
              • Additionally, mark the option "Deploy Byte Code Adapter under Managed System Instance(s)" within step "Enter System Parameters". SAP recommends providing a relative path name like ByteCodeAdapter for the "Introscope BC Adapter deployment path" field, in order to locate the Byte Code Adapter binaries and configuration files inside the Managed system directory structure (/usr/sap/<ManagedSID>/<InstanceID>).
              • The Diagnostics Agent OS user must have write permissions for this Managed System path location. For details see SAP note 1163751.
      • Restart the Java Managed System
If you experience problems with the Byte Code Adapter (Managed System does not restart), please check Introscope Troubleshooting (search for "uninstall").

Diagnostics Agent Removal

To remove a Diagnostics Agent instance installed for a specific host name:
  • In case the solman_setup “Deploy Byte Code Adapter under Managed System Instance(s)” option was used in the past to set up the Byte Code Adapter of the Java Managed System(s) running on the host (before 7.1 SP12 this option was called "Ensure HA virtualization compatibility"):
      • Optionally: Also uninstall the Byte Code Adapter by removing the JVM parameters listed in the relevant Instroscope Setup Guide from Introscope Home → Documentation.
  • Else, take the following actions (in case the solman_setup “Deploy Byte Code Adapter under Managed System Instance(s)” option was not used in the past during the Managed System Configuration):
      • IMPORTANT: Remove the JVM parameters used to start/run the Introscope Byte Code Adapter from the Java Managed System. These parameters listed in the relevant Instroscope Setup Guide from Introscope Home → Documentation.
      • NOTE: The Managed System JVM parameters (to be removed) show that the Introscope Byte Code Adapter executed by the Java Managed System uses files from the Diagnostics Agent directory structure, e.g.:
          • Xbootclasspath/p:D:/usr/sap/DAA/SMDA98/SMDAgent/applications.config/com.sap.smd.agent.application.wily/BytecodeAgent/ISAGENT.xxxxxxxxxx/wily/connectors/AutoProbeConnector.jar; D:/usr/sap/DAA/SMDA98/SMDAgent/applications.config/com.sap.smd.agent.application.wily/BytecodeAgent/ISAGENT.xxxxxxxxxx/wily/Agent.jar 
      • Restart the Java Managed system to no longer run the Introscope Byte Code Agent.
  • Run the Diagnostics Agent installer SWPM, to uninstall the Diagnostics Agent
If you experience problems with the Byte Code Adapter (Managed System does not restart), please check Introscope Troubleshooting (search for "uninstall").
After the Diagnostics Agent has been uninstalled, apply the option "Delete Offline Agent Entry" in the Agent Administration.

8/27/2017

How to open the client in SAP system?

Often in business scenarios, there will be requirements which cannot be transported and which have to be modified directly in respective tables and other repository objects. To perform these operations client to be opened.


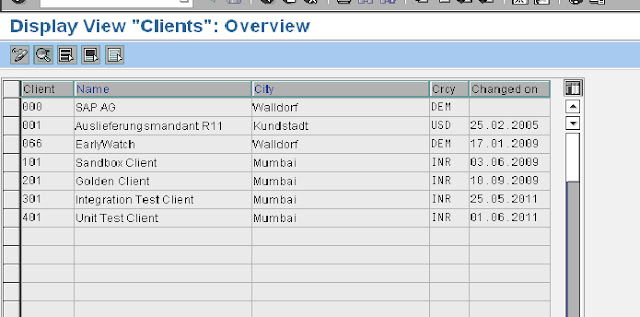
Goto transaction SCC4. This lists clients’ overview as below:


How to open the client in SAP system


From the above screen, we can make out what are the existing clients in the 
SAP system, their names and the date they are last modified.

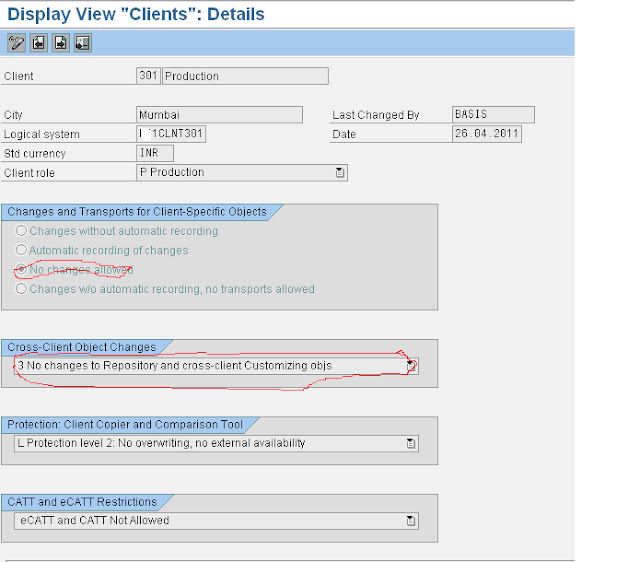
Double click on the client to be opened. It displays similar screen as below
with the complete client details like last changed date, last changed by, client
role and associated logical system of the client


How to open the client in SAP system

In the above screen, we can see the highlighted option that no changes allowed
and no changes to the repository and cross-client customizing objects. These 2
settings mean that client is NOT opened.

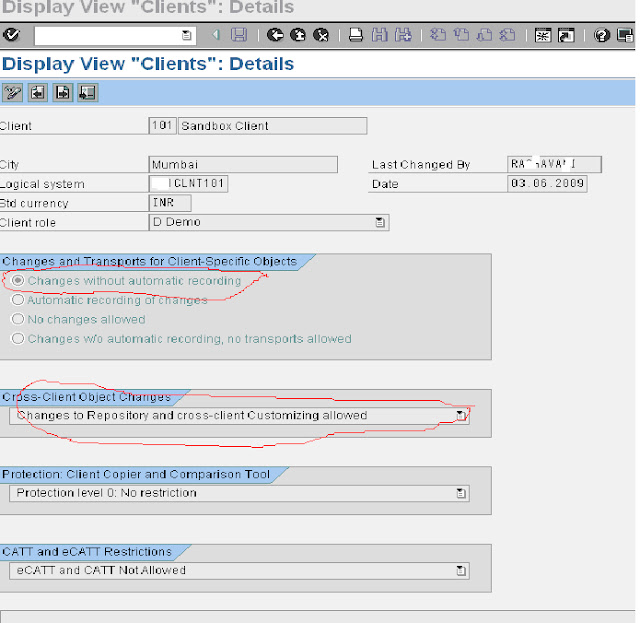
To open the client we should set the client settings as shown below for a client:

How to open the client in SAP system


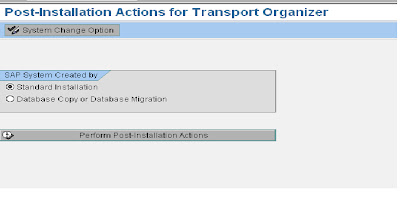
In addition to the above 2 settings, in SE06, System change option should be
set to “modifiable” as shown below:

Go to transaction SE06:


How to open the client in SAP system

Click on System change option as in the below screen

How to open the client in SAP system


In the above screen, set the Global setting as “modifiable” to make sure client
is opened.

In case you would like to restrict changes to a client, please set this Global
setting as non-modifiable so that no changes can be done.

Please note that the above setting of system change can be done through
SE03 transaction as well.

What are the various client settings and their significance?

Changes and transports for Client specific objects :

1) Changes without automatic recording: Changes will be done without
recording in a change  request

2) Automatic recording of changes: Changes will be done and  request will
get generated & changes will be captured in that

3) No changes allowed: No changes will be allowed

4) Changes w/o automatic recording no transports allowed: This flag
means customizing changes will be permitted but changes are not automatically recorded in the change request.

Cross –Client object changes :

1) No changes to cross-client object changes
2) No changes to repository objects
3) No changes to cross-client and repository objects
4) Changes to cross-client and repository objects.

8/21/2017

SAP How to delete user in SAP?

  • How to delete user in SAP?
  • How to display user details in SAP?
  • How to modify user details in SAP?
  • How to create  user in SAP by copying from existing user?

How to delete  user in SAP?
  
Goto SU01 transaction in SAP as shown below.


Enter the name of the user to be deleted in the text box and click on delete icon


Click on Yes button in the above screen to confirm the deletion.


Please make sure you see status message “User TEST123 deleted” on the status bar


How to display or modify user details in SAP?


     Provide the username which you would like to display in the text name and click on display button to display and change button to modify user details. Highlighted change button in blue and display button in red in the above screen.


A screen similar to below will appear in both the cases. If you select display, you can only view the user details. If you select, you can modify the user details and save.


How to copy a user and create another user?


Click on copy icon(highlighted in above screen), it displays the following screen. Please provide the details of from which user to would like to create. Check all the tabs which you would like to copy and click on copy button to confirm the user creation


The system displays the following screen to set the password. Please set password and save to create the user same as the existing user


Provide the password and click on save to create the user.

Checkout more :

10/24/2012

SAP How to Maintain Profiles - transaction RZ10

Use RZ10 transaction code to Manage Profiles of all Instances running in a SAP R/3 system.

when you run RZ10 the following screen will apear. You will see option to Edit Profile
  • Administration data
  • Basic Maintenance
  • Extended Maintenance
SAP-Edit-Profiles
Click on Utilities/Import Profiles/Of Active Servers. This will import all profiles in all the active instances.
SAP-System-Display-Profile-Check-Log
Click on Profile Button to see list of all imported profiles.
SAP-Restrict-Value-Range
Select the one that u need to maintain and click ok.

Maintain the Profile

Administration data Profile
SAP-System-Edit-Profiles
Choose One of Administration data, Basic Maintenance or Extended Maintenance and click display button to view the data or Change button to Change the data.
SAP-Edit-Profile-Management
Basic Maintenance: Change work processes and buffer Values Extended Maintenance You can manage all the parameters in this screen. Click on Param, Param+ and Param- buttons to change the value of a parameter.
SAP-Maintain-R-3-Profile


SAP-System-Edit-Profiles


SAP-System-Edit-Profiles
See also How to change/modify profile parameters in SAP R/3 - transaction RZ11

Popular Posts