Showing posts with label sap basis. Show all posts

7/05/2020

SAP Basis - New Dimensional Product

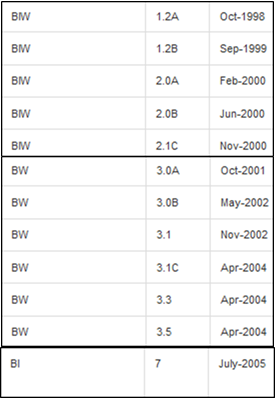
Introduction to BI / BW

SAP BI/BW is a data warehousing product and is based on SAP ABAP infrastructure. It is used to convert raw data into reports. This can also be used to build analytical reports and for decision making by business managers.
Using a Business Warehouse, you can combine data from different heterogeneous sources, organize and manage the data for detailed reporting.
This data warehousing product can easily be integrated with different SAP reporting tools. This product can help to analyze multidimensional data from different sources.
The key components in SAP NetWeaver Business Intelligence are −
  • SAP NetWeaver Business Warehouse (BW)
  • SAP Business Explorer (SAP BEx) and
  • SAP NetWeaver BW Accelerator (BWA)
Besides replicating data from the source to the SAP NetWeaver BW system, it is also possible to access the source data directly from the SAP NetWeaver BW system using Virtual Providers. The analytic engine provides methods and services for analysis, planning and generic services such as caching and security.
SAP Business Explorer BEx is used to define how data is displayed. This tool also supports the creation of Excel-based and web-based applications for analysis, planning, and reporting. The BEx applications created with the BEx tools can be integrated into the SAP Enterprise Portal. Integration with SAP BusinessObjects tools offers further options for analysis and reporting in addition to the standard SAP BEx functions. You can access BI information (like reports, analysis and dashboards) with the SAP BusinessObjects BI Portal InfoView.
Portal Infoview

Basis Integration with ECC

SAP ERP is based on SAP NetWeaver version. For example, SAP ERP 6.0 is based on SAP NetWeaver 7.0. SAP ERP is also based on enhancement packages; for example, ERP 6.0 is based on EHP04 and NetWeaver Enhancement Package — EHP01.
The software components always follow product numbering like SAP HR 6.04 belongs to Enhancement Package 4 for SAP ERP 6.0 and SAP BASIS 7.01 belongs to EHP01 for SAP NetWeaver 7.0.
Likewise,
  • SAP ECC 6.0 Enhancement Package 5 is based on SAP NetWeaver 7.0 Enhancement Package 02
  • ECC 6.0 Enhancement Package 4 is based on SAP NetWeaver 7.0 Enhancement Package 01
  • ECC 6.0 Enhancement Package 6 is based on SAP NetWeaver 7.0 Enhancement Package 03
Implementation of an EHP for ECC involves the application of SAP NetWeaver EHP (starting with ECC EHP 4).
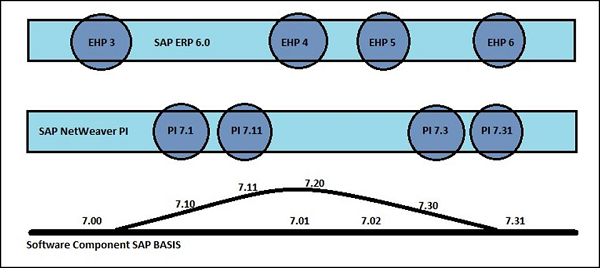
Integration with ECC

SAP Basis - RFC Between HANA and SAP ECC

Creating a Trusted RFC between SAP ECC and HANA

Suppose, you want to set up a trusted RFC towards target system BB1 on your source SAP system AA1. With the completion of the setup, you would be logged onto AA1 and your user would have enough authorization in BB1; you can use the RFC connection and logon to BB1 without having to re-enter username and password.
Using RFC trusted/trusting relationship between two SAP systems, RFC from a trusted system to a trusting system, password is not required for logging on to the trusting system.
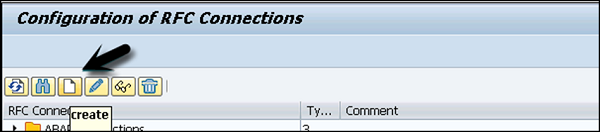
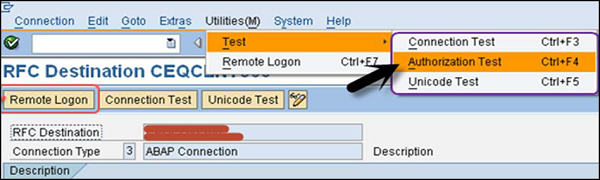
Open SAP ECC system using SAP logon. Enter transaction code SM59 → this is the transaction code to create a new Trusted RFC connection → Click on the 3rd icon to open a new connection wizard → click on Create and a new window will open.
SAP ECCConfiguration
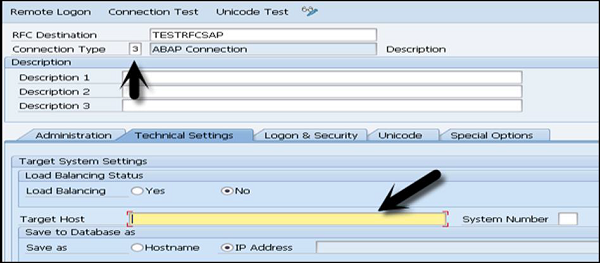
RFC Destination ECCHANA (Enter name of RFC destination) Connection Type — 3 (for ABAP system)
Go to Technical Setting.
Enter target host — ECC system name, IP and enter system number.
/connection Type
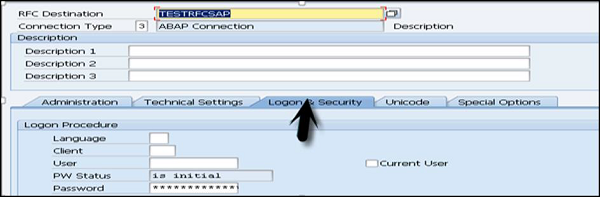
Go to Logon & Security Tab, Enter Language, Client, ECC system username and password.
Test RFC SAP
Click on the Save option at the top.
Destination
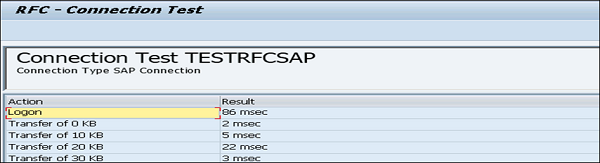
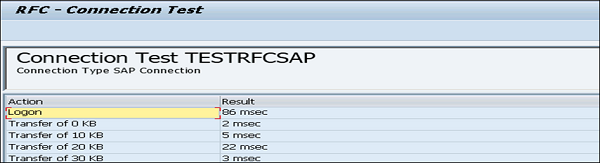
Click on Test Connection to successfully test the connection.
RFC Connection Test

Configuring RFC Connection

Follow these steps to configure RFC connection −
Step 1 − Run transaction — ltr (to configure RFC connection) → New browser will open→ Enter ECC system username and password and logon.
Monitoring
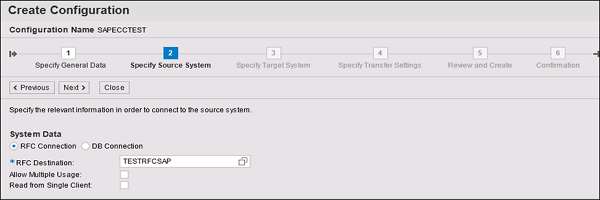
Step 2 − Click on New → New Window will open → Enter configuration name → Click Next → Enter RFC Destination (connection name created earlier), Use search option, Choose name and click Next.
Create Configuration
Step 3 − In Specify Target system, Enter HANA system admin username & password, host name, Instance number and click Next. Enter number of data transfer jobs like 007 (it can’t be 000) → Next → Create Configuration.

Testing Trusted RFC

Click on Test Connection to successfully test a connection.
Trusted RFCConnection Test

SAP Basis - Kernel Upgrade and Patching


Kernel is an executable program that exists between SAP Applications and Operating System. It consists of executable program under the path — "/sapmnt//exe" for UNIX and \usr\sap\SID\SYS\exe\run Windows. It starts and stops application services such as message server, dispatcher, etc.
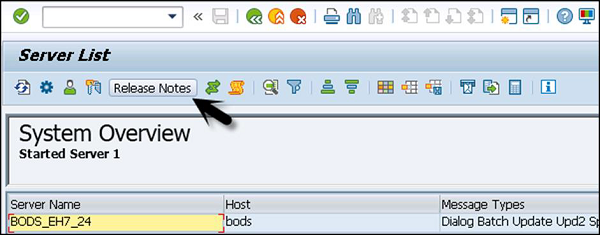
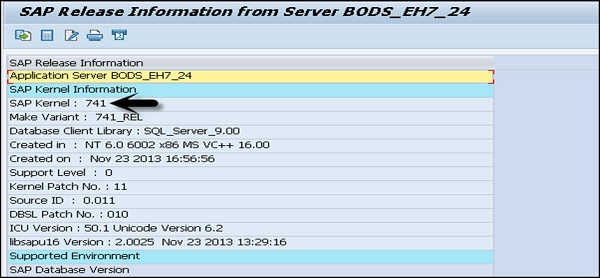
In Kernel upgrade, new .exec files replace old executable files in SAP system. To check the current version, use transaction code — SM51 > Go to Release Notes.
Server ListSAP Information
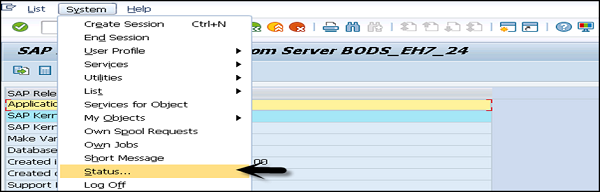
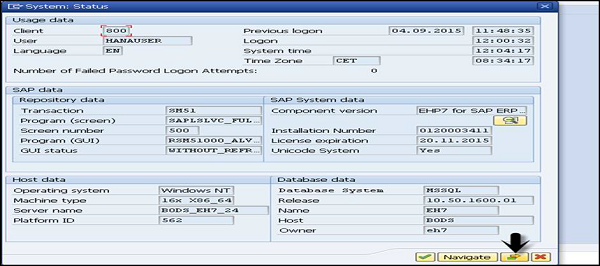
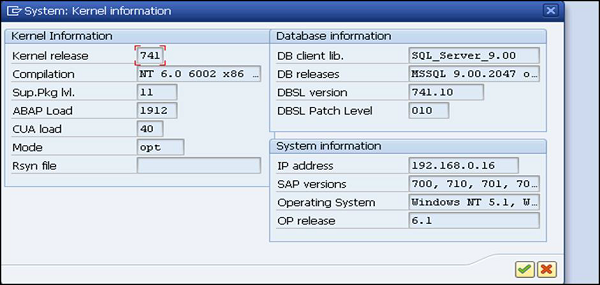
To check the status, go to System → Status tab → Other Kernel info
SAP StatusSystem StatusKernel Information
In UNIX, use disp+work − version to see information on the current Kernel version.
Follow these steps to download Kernel from SAP Market Place −
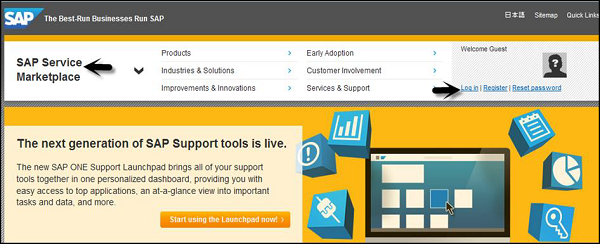
Step 1 − Open URL — https:\\service.sap.com and login with SID and password.
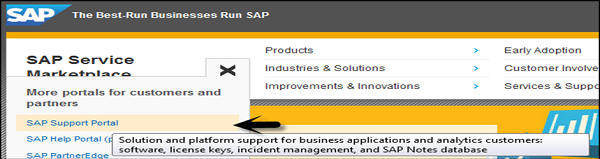
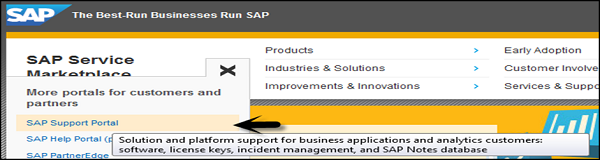
Step 2 − Go to SAP Support Portal from dropdown → Software Downloads.
SAP BusinessesSAP Support Portal
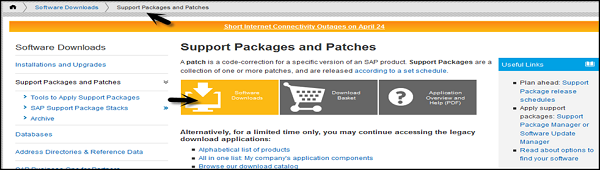
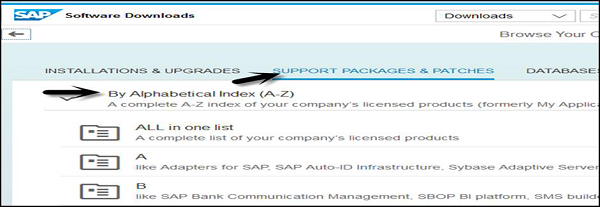
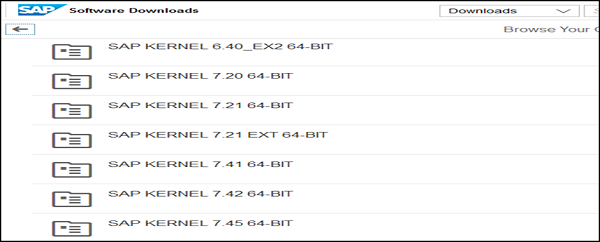
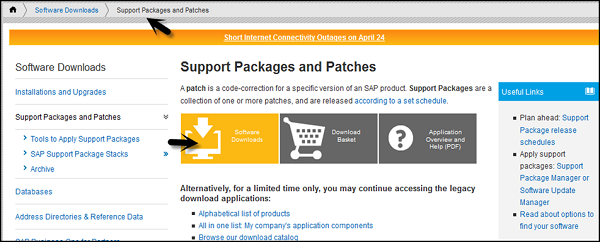
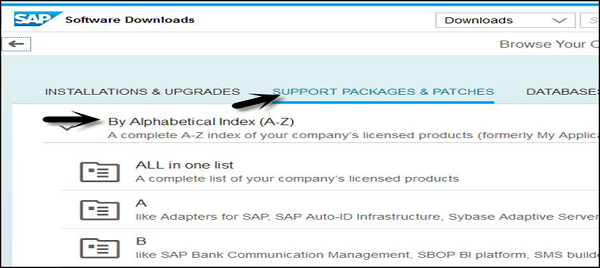
Step 3 − Go to Support Packages and patches under software downloads. Go to Software Downloads.
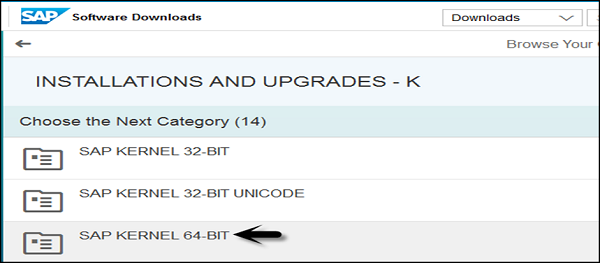
PatchesSAP Software DownloadsSAP Kernel 64-BIT
All Kernel Versions are available in 64-bit −
SAP Software
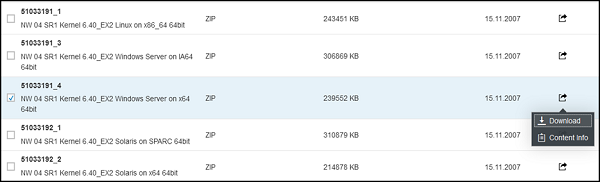
Step 4 − Select the Kernel version and download the files as per the Operating System – Windows, Linux, Solaris, AIX, and HP-UX.
Kernel Versions

Upgrade Kernel Version

Let us now follow these steps to upgrade the Kernel version −
Step 1 − Create a directory with enough disk space and enter the name of directory.
Step 2 − Copy the upgrade files SAPEXEDB.SAR & SAPEXE.SAR files to the new directory at OS level.
Step 3 − To check directory, use 'pwd' to ensure you are in the same directory.
STep 4 − Now, uncompress .SAR files by sapcar exe.
SAPCAR –xvf sapexe.SAR
SAPCAR –xvf sapexedb.SAR
SAPCAR
Step 5 − To take backup of existing Kernel, you have to create one more directory with the name "exe_old" and take backup of existing Kernel file.
Step 6 − To perform upgrade, stop the SAP application. You don’t need to shut down the database for Kernel upgrade but you need to stop the SAP application using this command — stopsap r3.
Step 7 − Copy the files from the new kernel directory exe_new
Step 8 − Use this command to copy — cp -rp /sapmnt//exe_new/* /sapmnt//exe/
Step 9 − Now if you check the current Kernel version using disp+work, then check the kernel version from OS level by the command disp+work − versions and new patch version should be displayed.
Step 10 − Login to the operating system as root specific to UNIX. Execute the script in Kernel directory — ./saproot.sh
You use this to assign correct permissions to all the executable programs in the kernel such as br* file etc.
Step 11 − Start SAP Applications using this command — startsap r3.
Step 12 − If you run Transaction SM52, you can see current kernel version level.

SAP Kernel Upgrade and Patching

SAP Basis - Importing a Queue

Queue is used to check support packages for different SAP components in your system landscape.
Follow these steps to import a queue −
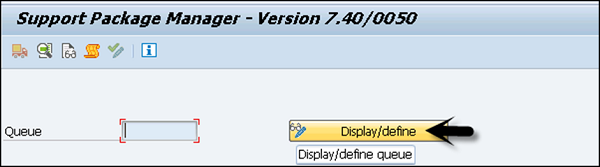
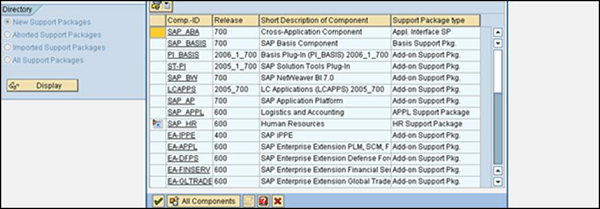
Step 1 − Click on Display/Define button and you will see a list of installed software components.
Support Package ManagerDisplay
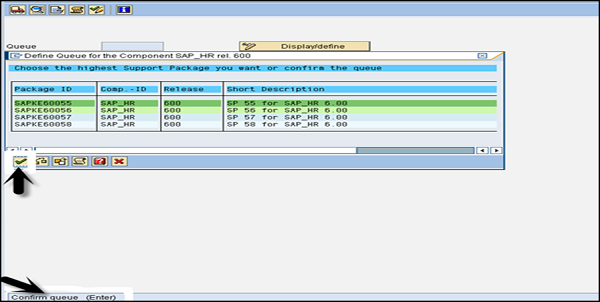
Step 2 − Select the component and it will display the list of Support Packages available for the selected components. If this is the queue you are looking for, click Confirm Queue.
Confirm Queue
Step 3 − You will receive confirmation - Support Package Queue Saved and Defined.
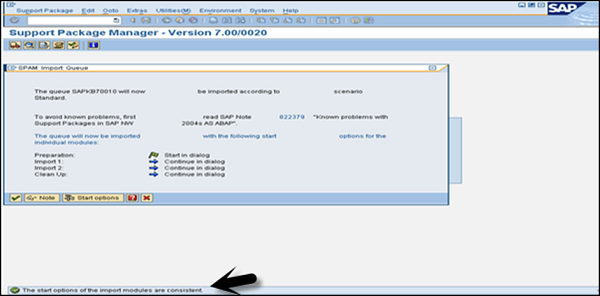
Step 4 − Now, import queue to start implementing the Support Package. Click Support package → Import Queue.
Import Queue
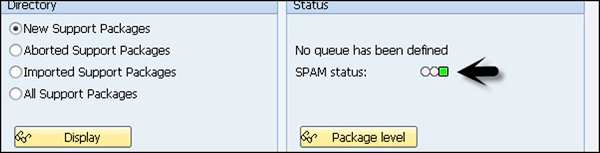
Step 5 − Confirm the queue once the support package is imported successfully. If you don’t confirm the queue, you won’t be able to import support package in future. Check the SPAM status → Confirm successful import of support package.
Directory
The following issues occur while implementing Support Packages −
  • Tablespace overflow
  • Kernel outdated
  • SPAM/SAINT outdated
  • Check environmental variables
  • RDDIMPDP job not scheduled
  • Inconsistency in TMS
  • Max extents reached
  • Space constraint in Transport directory
  • “tp" could not connect to database (Execute R3trans –d which will generate trans.log)
  • STMS configuration issue
  • Background jobs terminated due to memory-related issues
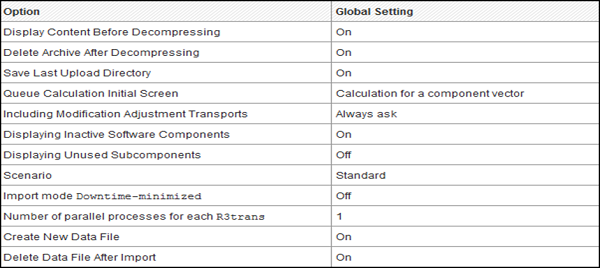
The following table shows the default values of Support Package Manager −
Global Setting
To save on the hard disk space, you can specify if data files need to be deleted after the Support Packages have been imported. As mentioned, this is the default setting in Support Package Manager.

SAP Basis - Patch Management

Queue is used to check support packages for different SAP components in your system landscape.
Follow these steps to import a queue −
Step 1 − Click on Display/Define button and you will see a list of installed software components.
Support Package ManagerDisplay
Step 2 − Select the component and it will display the list of Support Packages available for the selected components. If this is the queue you are looking for, click Confirm Queue.
Confirm Queue
Step 3 − You will receive confirmation - Support Package Queue Saved and Defined.
Step 4 − Now, import queue to start implementing the Support Package. Click Support package → Import Queue.
Import Queue
Step 5 − Confirm the queue once the support package is imported successfully. If you don’t confirm the queue, you won’t be able to import support package in future. Check the SPAM status → Confirm successful import of support package.
Directory
The following issues occur while implementing Support Packages −
  • Tablespace overflow
  • Kernel outdated
  • SPAM/SAINT outdated
  • Check environmental variables
  • RDDIMPDP job not scheduled
  • Inconsistency in TMS
  • Max extents reached
  • Space constraint in Transport directory
  • “tp" could not connect to database (Execute R3trans –d which will generate trans.log)
  • STMS configuration issue
  • Background jobs terminated due to memory-related issues
The following table shows the default values of Support Package Manager −
Global Setting
To save on the hard disk space, you can specify if data files need to be deleted after the Support Packages have been imported. As mentioned, this is the default setting in Support Package Manager.

SAP Basis - Patch Management


In SAP system, a patch is used to fix a bug. There are different types of patches that can be used in SAP system. All patches start with SAPK followed by patch type.
The following are the four different types of patches −
  • ABAP (SAPKA620XXXX)
  • BASIS (SAPKB620XXXX)
  • HR (SAPKE470XXXX)
  • APPLICATIONS (SAPKH470XXXX)
A patch follows this structure — SAPKA
Patches are also called support packs and they should be applied in the following sequence −
  • BASIS (SAPKB620XXXX)
  • ABAP (SAPKA620XXXX)
  • HR (SAPKE470XXXX)
  • APPLICATIONS (SAPKH470XXXX)

Support Packages and Add-ons

As the name suggests, support packages are used to fix the bug and to improve the quality of SAP system. Support package implementation and administration is done with Transaction Spam (Support Package Manager). Each support package is valid for one release and Support Package Manager ensures that all support packages are applied in a specified order.
Support packs are applied in the above mentioned order — Basis > ABAP > HR > Applications. It is not necessary that Basis and ABAP patch levels should be same but SAP recommends that they should be at the same level. Generally, Basis and ABAP should be applied together however to apply one first, it should be Basis.
All support packs are applied with client 000. Support packages should be imported at regular intervals to avoid errors and to keep system landscape up to date.
There are different types of support packages available −
  • SPAM Update − A SPAM Update contains updates and improvements to Support Package Manager (SPAM) and Add-On Installation Tool.
  • Component Support Package − This contains improvement for one software component such as SAP Basis, SAP HR or SAP APPLICATIONS and to update repository and dictionary objects.
The following table shows some naming conventions for Support Packages −
Software ComponentName
SAP_APPLAPPL Support Package
SAP_BASISBasis Support Package
SAP_ABAApplication Interface Support Package
SAP_HRHR Support Package
SAP_BWBW support Package
  • Conflict Resolution Transport − This is used to adjust the support packages on add on. A CRT for one release also contains adjustment for earlier releases of this add-on.

Requirements to Implement Support Package

A support package is always implemented on client 000 and user should have an authorization equivalent to DDIC or SAP.
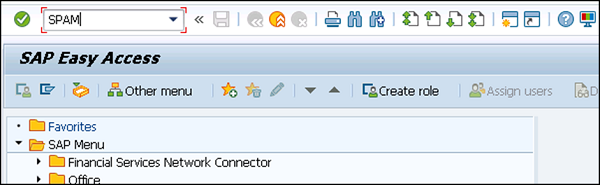
To implement a support package, use transaction code — SPAM. You can check if any previous package is in progress or is incomplete. If there is an incomplete support package, you can’t proceed with the implementation of a new one.
Note − Transport directory /usr/sap/trans should have enough space.

Support Package and Stack Update

You can download support package from SAP Service Market place. Open the link — service.sap.com and login with your SID.
SAP Service
Go to SAP Support Portal from the dropdown → Software Downloads
SAP MarketplaceSupport Portal
Go to Support Packages and Patches under software downloads. Now, go to Software Downloads.
Support PackagesSoftware Downloads
Download the support package and save in OS level Transport directory /usr/sap/trans
Uncompress the file- sapcar –xvf
You can see .ATT and .PAT files in Transport directory.
ATT and PAT
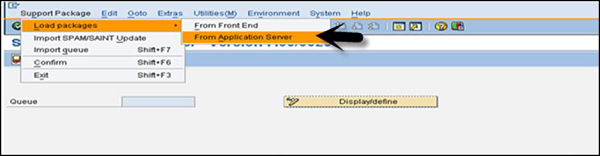
To load the support package from application Server, use transaction code — SPAM. Support Package → Load Packages → From Application Server
SAP SPAMLoad Packages
Or you can also load it from Front End in case it is < 10 MB. The support packages which are in the form of .car will be decompressed into eps/in directory.
If the size of the Support Package is greater than 10mb, then copy the support packages to /trans directory as above and uncompress to .ATT and .PAT files.

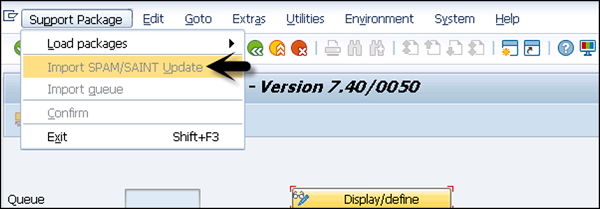
SPAM Update

You can also update Support Package Manager and Add-on installation tool. This should be performed before any support package upgrade.
Import SPAM

SAP Basis - Managing Transport Routes

Transport routes are defined as routes that are defined by a SAP Administrator to transmit the changes between different SAP systems.
The following are the two types of transport routes −
  • Consolidation (From DEV to QAS) — Transport Layers are used
  • Delivery (From QAS to PRD) — Transport Layers not required

Transport Request

This contains a number of changes to be implemented in the development system. It consists of the types of changes, purpose, change category, target system and other details.
Transport request are named in a standard format like K
For example, in K −
  • SID represents System ID
  • K stands for fixed keyword/alphabet
  • Number can be anything from a range starting with 900001
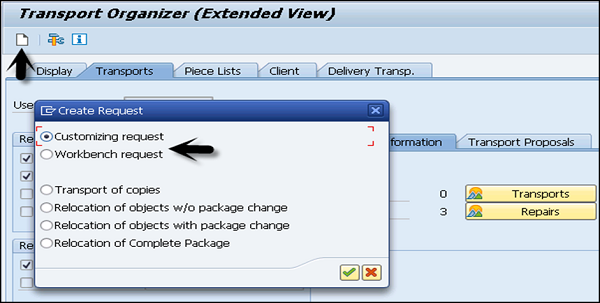
There are two type of request types that can be created in the SAP system −

Workbench Request

This request type contains the repository objects and cross-client customizing objects. Workbench requests are used to make changes in the ABAP workbench objects.

Customizing Request

This request type contains objects that belong to ‘client-specific’ customizing. These requests are created in system automatically when a user performs customizing setting and a target system is automatically assigned as per the transport layer.
Transport Organizer
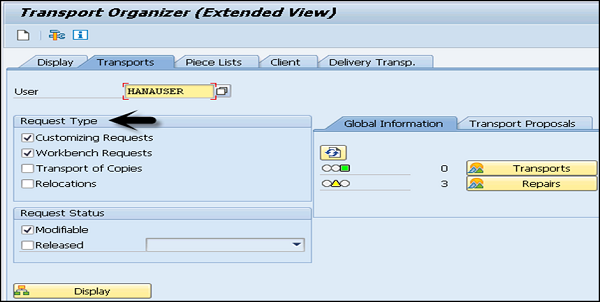
To create a Transport Request, use transaction code — SE01
A Transport Request can be created in the following two ways −
  • Automatic − This way you can create or modify an object, or perform customizing settings. Here, the system displays the 'Dialog box' for creating a transport request or mention name of an already created request, if available.
  • Manual − This way you can create the transport request from the Transport Organizer, and then enter required attributes and insert objects.
Organizer Extended View

Import / Export of Objects

Once transport request is completed in the source system, you have to export the request from the source system and import it to the target system. To perform the import, you have to select an import queue.
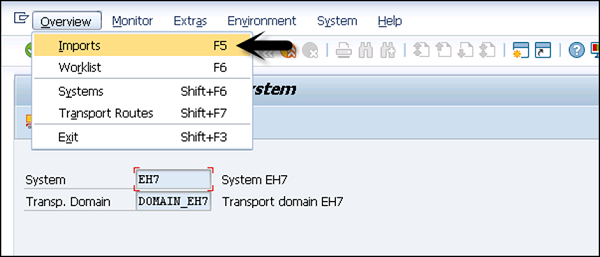
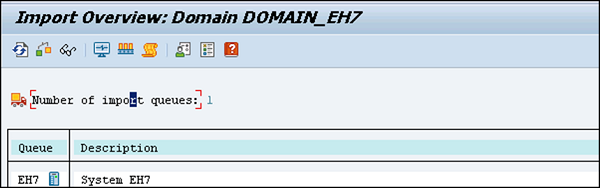
Transaction STMS → Import or you can go to Overviews tab at the top → Imports
SAP Overview
You can see a list of systems in the current domain, description and a number of requests available in Import Queue and the status.
Import Overview

Import a Queue

This list contains Transport Requests in the common directory. These requests are ready to be imported to the target system.
Import Queues
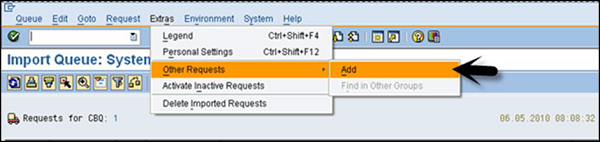
To add a request manually, you can go to other requests → Add (you should know the name of Transport request).
Other Requests

Transport Request Logs

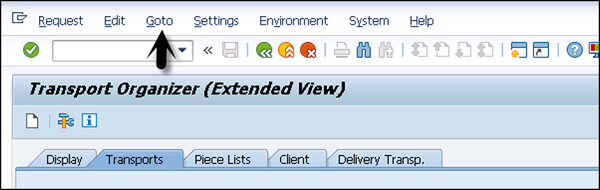
You can also check the logs once the transport request is completed. To check the logs, use transaction code — SE01 → GoTo → Transport Logs
Extended View
There are two types of logs available in Transport Management System −

Transport Logs

It keeps track of the transport log files that have been moved in a Transport Request.

Action Log

It includes the details of all the actions that have been performed in a Transport Request. Actions such as exports, import, etc.
One of the important functions provided by the logs are the following return codes −
  • 0 − This value represents that export was successful.
  • 4 − This value represents that a warning was issued and the objects were transported successfully.
  • 8 − This value represents that a warning was issued and at least one object could not be transported.
  • 12 or higher − This value represents an error in transport request and it is generally not caused by the objects in Transport Request. This probably occurs because of system failure.

Popular Posts