12/27/2017

Logical Volume Manager (LVM). Part 4 Use case

Continue to describe LVM from the practical point of view.
The previous parts are available here:

Logical Volume Manager (LVM). Part 1.Basics
Logical Volume Manager (LVM). Part 2 Commands
Logical Volume Manager (LVM). Part 3 Commands

Another typical situation is when you need to arrange access to a file system Volume Group from
different servers. The disks are 
physicallylocatedin the disk array, for example, in network SAN
(Storage Area Network) and multiple servers have access to those drives. 
This configuration is
required for the Organization of the work of the failover cluster on the basis of the MC/ServiceGuard
.

The sequence is as follows:

  1. Create the Volume Group (c) Logical Volumes and file systems with mount points on the
    same server. 
    Name it the source (host1).
  2. Unmount file systems and deactivate the Volume Group on the source server:
    • umount /data
    • vgchange -a n/dev/vg01  
  3. Create a special mapping file Volume Group on the source server and copy it to the new
    server. 
    Lets name it target  (host2).
    • vgexport -p -s -m /vg01.map/dev/vg01 pay attention to the-p option
      (mode, when the export Volume Group vg01 is not deleted on the source server),
    • rcp /vg01.map host2:/vg01.map
  4. On the destination server to prepare disks presented with disk array, which were included
    in the Volume Group vg01 on the source server, create a directory and a file for Volume
    Group vg01:
    • the ioscan -fnC disk - in case when devices were not created, to create use the
       command: insf-C disk , nothing to do else with the disks then.
    • mkdir /dev/vg01
    • mknod /dev/vg01/group c 64 0x010000 -to search for free junior rooms use the
       command: ls-al /*/group
  5. Import to the target server using the mapping file that you obtained in step 3:
    • vgimport-s-m/vg01.map/dev/vg01 -team itself finds the disks and add them to a new
       Volume Group; the failover command to verify that you can use the command:
      strings /etc/lvmtab
  6. You can now activate the Volume Group on the target server, save the configuration to
    restore, create a mount point, mount the file system and, if necessary, prescribe automatic
     mounts in/etc/fstab:
    • vgchange -a y /dev/vg01 
    • vgcfgbackup /dev/vg01
    • mkdir /data 
    • mount /dev/vg01/lvol1/data
    • vi /etc/fstab
By this method the Volume Groups can be migrated from one server to another. In this case it
is necessary to remove them after the migration on the source server with the following command:
  • vgexport /dev/vg01

Logical Volume Manager (LVM). Part 3 Commands

Command to gather information about file systems, the structure of the LVM, etc.:
  •  bdf -list of mounted file systems.
  •  ls -ltra /*/group  -cool command to view control files of all Volume Groups on the server.
     
    Is often useful when finding free minor-rooms for the new Volume Group.
  •  lvdisplay -v/dev/vg01/lvol1 -information about Logical Volume, you can try lvol1 general case:
  •  cat /etc/fstab -a list of all the file systems that are mounted at startup OS
  •  vgdisplay -v information about all Volume Groups
  •  vgdisplay-v vg01 -  information about the specific group.
  •  lvdisplay -v/dev/vg01/lv * -information about all Logical Volume from a Volume Group vg01.
  • pvdisplay -v /dev/dsk/c1t1d2 -information on the Physical Volume.
Expansion Volume Group (adding disk) Logical Volume:
  1.  pvcreate -f /dev/rdsk/c1t1d2 -to prepare a disk for connecting to LVM,
  2.  vgextend vg01 /dev/dsk/c1t1d2 -add to an existing Volume Group vg01 new drive.
  3.  lvextend -L /dev/vg01/lvol1 48000 -extend Logical Volume size to 48000 lvol1 MB.
Extend filesystem on lvol1 (prior to this event, though the drive (Logical Volume) and became more,
 but the file system will not be able to use it):

  • umount /data -unmount file system
  • extendfs -F vxfs/dev/vg01/rlvol1 -extend the file system on any space
  • mount /data -mount extended file system
  • bdf -check out the new size.
Reducing of the file system and Logical Volumes is very rare operation, because prior to this,
you must delete the data by making a backup, and after you reduce the file system and Logical Volume commands newfs and lvreduce command
.

Commands to delete Logical Volume:

  1.  umount /data -unmount file system
  2.  lvremove -f /dev/vg01/lvol1 -remove a Logical Volume with option "force" (in spite of
     the existence of the file system and data)
  3.  vi /etc/fstab -edit the list of mounted file systems in Windows is restarted,
  4.  vgdisplay -v vg01 -verify that Logical Volume.
Remove a physical disk from a Volume Group:
  1.  pvmove/dev/dsk/c1t1d2 /dev/dsk/c1t2d1 -move data from disk c1t1d2 on another
     disk in the Volume Group (if you do not specify a second disk, the command will place itself
     on the remaining disks in the Volume Group, of course, subject to the availability of places on them),
  2.  pvdisplay -v /dev/dsk/c1t1d2 -check that there is no data on the disk (a single physical
     extent-PE)
  3.  vgreduce vg01 /dev/dsk/c1t1d2 -remove the disk from the Volume Group vg01,
  4.  vgdisplay -v vg01 -check changes.
Removing a Volume Group:
  1.  lvremove -f /dev/vg01/lvol1 -remove all Logical Volumes,
  2.  vgreduce vg01/dev/dsk/c1t1d2 -remove all but one of the disks
  3.  vgremove vg01 -Delete Volume Group vg01,
  4.  rm-irf/dev/vg01 - force remove of a directory vg01.
You can remove a single command: 
 vgexport/dev/vg01 - remove everything about anything without asking. :)

Activation and deactivation of the Volume Group:

  •  vgchange-a n vg01 -deactivates the Volume Group vg01, removing it from the LVM kernel
     tables,
  •  vgchange-a y vg01 -activates the Volume Group vg01, making possible the mounting of
     file systems (automatic activation is performed when Windows is restarted)
  •  vgchange-a r vg01 -activate Volume Group vg01 in read-only mode.
Command sequences are correct for the file systems HFS, JFS. There is an additional option,
which can be purchased at the HP Online JFS. 
There's "cool things"  like reducing - extending
the file system without unmount etc. The main command - 
fsadm.

Logical Volume Manager (LVM). Part II

In the first part of the article about LVM I described the structure and basic configuration files. The second part will focus on  LVM configuration commands.


Create Volume Group vg01:
  1. Find free disks. Useful commands:
    - ioscan-funC disk -lists the drives in the system,
    - insf-C disk -creates device files to disk (if there was),
    bdf -list of mounted file systems (helps define engaged wheels)
    swapinfo-d -displays the disks and filesystems, used as a swap area
    strings/etc/lvmtab -list existing volume group and drives in them
    vxdisk list -a list of drives employed in VxVM (another system/disk management).
  2. Check the availability and integrity of the selected disks. For example,/dev/dsk/c0t1d0:
    1. diskinfo/dev/rdsk/c1t1d2 -information about the disk
    2. dd if =/dev/rdsk/c1t1d2 of =/dev/null bs = 1024 k -read the contents of a disk, a
      search for "bad blocks".
  3. Prepare disks by creating them physical volumes (PV):
    pvcreate-f/dev/rdsk/c1t1d2 for slow disks, you can specify a larger timeout by adding the
    option "-t 180".
  4. Create a directory and a control file (group special file):
    1. mkdir/dev/vg01
    2. chmod 755/dev/vg01
    3. mknod/dev/vg01/group c 64 0x010000 the control file is always character type-c
      major (major) always-64 and younger (minor) is encoded 0xhh0000, where hh is a unique
      hexadecimal number of the VG
      .
    4. chown-R root: sys/dev/vg01
    5. chmod 640/dev/vg01/group
  5. Create A Volume Group:
    vgcreate/dev/vg01/dev/dsk/c1t1d2 if multiple disks, then scroll through the gap. 
    A set
     of parameters that can be set:
    -s 1-256 ( default  4 MB ) the size of the physical extent (pieces that are distributed)
    -p
     1-255 ( default 255 ) the maximum number of PV 
    -l 1-255 ( default 255 ) the maximum number of LV,
    -e 1-65535 (default, 1016  which corresponds to 4 GB) is the maximum number of physical
    extents on disk (physical). 
    Is very important and is set depending on the size of the volume
    by the formula: PV size < >/< > size of the extent.

    Does not change in the future, making it impossible to add more disks larger than the original,
    in the Volume Group
    .
  6. View VG settings command:
    - vgdisplay vg01
Now you can create the Logical volume: lvol1
  1. Reserve the name:
    - lvcreate-n lvol1 vg01
  2. Expand the LV to the desired size by selecting what disk in VG:
     lvextend-L 200/dev/vg01/lvol1/dev/dsk/c1t1d2 the key-L Specifies the size, in MB
     and the key-l specifies the size in extents. 
    Be careful.
  3. You can set additional parameters:
    lvchange-a y | n/dev/vg01/lvol1 -resolution | ban on the use of LV.
    lvchange-p r | w/dev/vg01/lvol1 -the right to "read-only" | " read-write when using a
      Logical Volume
    .
    lvchange-r y | n | N/dev/vg01/lvol1 -options for working with "bad blocks": move the
     "bad blocks" | does not move and I/O error | disables the mechanism for the use of disk array,
     for example.
  4. Show volume settings you can command: lvdisplay/dev/vg01/lvol1
You can create a Logical Volume in a single command lvcreate, immediately indicating the size,
but the above sequence of commands allows you to specify which drive of the VG will be a LV
This adds flexibility when creating.

Use Logical Volume lvol1:
  • As the file system:
    1. newfs-F vxfs/dev/vg01/rlvol1
    2. mkdir/data
    3. mount/dev/vg01/lvol1/data
    4. vi/etc/fstab -add a file system to mount after reboot.
  • As a swap area:
    1. swapon/dev/vg01/lvol1
    2. vi/etc/fstab -add to use after the reboot.
Before using read the documentation man:


12/13/2017

Logical Volume Manager (LVM) Part I Basics

LVM stands for Logical Volume Management. It is a system of managing logical volumes or file systems, that is much more advanced and flexible than the traditional method of partitioning a disk into one or more segments and formatting that partition with a filesystem.

This article primarily related to HP-UX operating system. 

However other operating systems may have their own peculiarities and nuances, but the basis is certainly one.

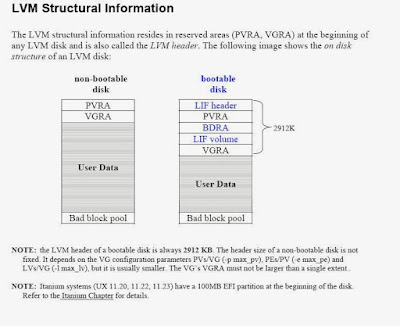
The disk that is part of the LVM has a specific structure and contains service information.

LVM structure: one or more disks are combined into a Volume Group (VG) within which
you can create one or more Logical Volume (LV),  between which to allocate the disk space of the volume group drives. On Logical Volume, create file systems or swap areas and specify mount points.

Useful directories and files: /DEV/DSK/CXTXDX and/DEV/RDSK/CXTXDX device files (block and raw) of the hard drives in the system /dev/vgxxx/group -Device file for Volume group Vgxxx /dev/vgxxx/lvxxx and /dev/vgxxx/rlvxxx -Logical volume (block and raw) files from the Volume Group VGxxx, /etc/lvmtab is a binary file that contains a list of the system's Volume Groups and a list of their hard drives (physical volumes). Some of the information from the file can be viewed by the strings command /etc/lvmconf - a directory with the backups of the Volume Group configuration files. is updated with the volume Group or Logical volume change commands or a single command - vgcfgbackup. A list of file systems and mount points used to automatically mount file systems at the start of the OS is a list of what is currently being installed. Information is used by the Mount/umount(2) and DF/BDF.

Logical volume manager
Добавьте подпись

Popular Posts