12/27/2017

Logical Volume Manager (LVM). Part 4 Use case

Continue to describe LVM from the practical point of view.
The previous parts are available here:

Logical Volume Manager (LVM). Part 1.Basics
Logical Volume Manager (LVM). Part 2 Commands
Logical Volume Manager (LVM). Part 3 Commands

Another typical situation is when you need to arrange access to a file system Volume Group from
different servers. The disks are 
physicallylocatedin the disk array, for example, in network SAN
(Storage Area Network) and multiple servers have access to those drives. 
This configuration is
required for the Organization of the work of the failover cluster on the basis of the MC/ServiceGuard
.

The sequence is as follows:

  1. Create the Volume Group (c) Logical Volumes and file systems with mount points on the
    same server. 
    Name it the source (host1).
  2. Unmount file systems and deactivate the Volume Group on the source server:
    • umount /data
    • vgchange -a n/dev/vg01  
  3. Create a special mapping file Volume Group on the source server and copy it to the new
    server. 
    Lets name it target  (host2).
    • vgexport -p -s -m /vg01.map/dev/vg01 pay attention to the-p option
      (mode, when the export Volume Group vg01 is not deleted on the source server),
    • rcp /vg01.map host2:/vg01.map
  4. On the destination server to prepare disks presented with disk array, which were included
    in the Volume Group vg01 on the source server, create a directory and a file for Volume
    Group vg01:
    • the ioscan -fnC disk - in case when devices were not created, to create use the
       command: insf-C disk , nothing to do else with the disks then.
    • mkdir /dev/vg01
    • mknod /dev/vg01/group c 64 0x010000 -to search for free junior rooms use the
       command: ls-al /*/group
  5. Import to the target server using the mapping file that you obtained in step 3:
    • vgimport-s-m/vg01.map/dev/vg01 -team itself finds the disks and add them to a new
       Volume Group; the failover command to verify that you can use the command:
      strings /etc/lvmtab
  6. You can now activate the Volume Group on the target server, save the configuration to
    restore, create a mount point, mount the file system and, if necessary, prescribe automatic
     mounts in/etc/fstab:
    • vgchange -a y /dev/vg01 
    • vgcfgbackup /dev/vg01
    • mkdir /data 
    • mount /dev/vg01/lvol1/data
    • vi /etc/fstab
By this method the Volume Groups can be migrated from one server to another. In this case it
is necessary to remove them after the migration on the source server with the following command:
  • vgexport /dev/vg01

Logical Volume Manager (LVM). Part 3 Commands

Command to gather information about file systems, the structure of the LVM, etc.:
  •  bdf -list of mounted file systems.
  •  ls -ltra /*/group  -cool command to view control files of all Volume Groups on the server.
     
    Is often useful when finding free minor-rooms for the new Volume Group.
  •  lvdisplay -v/dev/vg01/lvol1 -information about Logical Volume, you can try lvol1 general case:
  •  cat /etc/fstab -a list of all the file systems that are mounted at startup OS
  •  vgdisplay -v information about all Volume Groups
  •  vgdisplay-v vg01 -  information about the specific group.
  •  lvdisplay -v/dev/vg01/lv * -information about all Logical Volume from a Volume Group vg01.
  • pvdisplay -v /dev/dsk/c1t1d2 -information on the Physical Volume.
Expansion Volume Group (adding disk) Logical Volume:
  1.  pvcreate -f /dev/rdsk/c1t1d2 -to prepare a disk for connecting to LVM,
  2.  vgextend vg01 /dev/dsk/c1t1d2 -add to an existing Volume Group vg01 new drive.
  3.  lvextend -L /dev/vg01/lvol1 48000 -extend Logical Volume size to 48000 lvol1 MB.
Extend filesystem on lvol1 (prior to this event, though the drive (Logical Volume) and became more,
 but the file system will not be able to use it):

  • umount /data -unmount file system
  • extendfs -F vxfs/dev/vg01/rlvol1 -extend the file system on any space
  • mount /data -mount extended file system
  • bdf -check out the new size.
Reducing of the file system and Logical Volumes is very rare operation, because prior to this,
you must delete the data by making a backup, and after you reduce the file system and Logical Volume commands newfs and lvreduce command
.

Commands to delete Logical Volume:

  1.  umount /data -unmount file system
  2.  lvremove -f /dev/vg01/lvol1 -remove a Logical Volume with option "force" (in spite of
     the existence of the file system and data)
  3.  vi /etc/fstab -edit the list of mounted file systems in Windows is restarted,
  4.  vgdisplay -v vg01 -verify that Logical Volume.
Remove a physical disk from a Volume Group:
  1.  pvmove/dev/dsk/c1t1d2 /dev/dsk/c1t2d1 -move data from disk c1t1d2 on another
     disk in the Volume Group (if you do not specify a second disk, the command will place itself
     on the remaining disks in the Volume Group, of course, subject to the availability of places on them),
  2.  pvdisplay -v /dev/dsk/c1t1d2 -check that there is no data on the disk (a single physical
     extent-PE)
  3.  vgreduce vg01 /dev/dsk/c1t1d2 -remove the disk from the Volume Group vg01,
  4.  vgdisplay -v vg01 -check changes.
Removing a Volume Group:
  1.  lvremove -f /dev/vg01/lvol1 -remove all Logical Volumes,
  2.  vgreduce vg01/dev/dsk/c1t1d2 -remove all but one of the disks
  3.  vgremove vg01 -Delete Volume Group vg01,
  4.  rm-irf/dev/vg01 - force remove of a directory vg01.
You can remove a single command: 
 vgexport/dev/vg01 - remove everything about anything without asking. :)

Activation and deactivation of the Volume Group:

  •  vgchange-a n vg01 -deactivates the Volume Group vg01, removing it from the LVM kernel
     tables,
  •  vgchange-a y vg01 -activates the Volume Group vg01, making possible the mounting of
     file systems (automatic activation is performed when Windows is restarted)
  •  vgchange-a r vg01 -activate Volume Group vg01 in read-only mode.
Command sequences are correct for the file systems HFS, JFS. There is an additional option,
which can be purchased at the HP Online JFS. 
There's "cool things"  like reducing - extending
the file system without unmount etc. The main command - 
fsadm.

Logical Volume Manager (LVM). Part II

In the first part of the article about LVM I described the structure and basic configuration files. The second part will focus on  LVM configuration commands.


Create Volume Group vg01:
  1. Find free disks. Useful commands:
    - ioscan-funC disk -lists the drives in the system,
    - insf-C disk -creates device files to disk (if there was),
    bdf -list of mounted file systems (helps define engaged wheels)
    swapinfo-d -displays the disks and filesystems, used as a swap area
    strings/etc/lvmtab -list existing volume group and drives in them
    vxdisk list -a list of drives employed in VxVM (another system/disk management).
  2. Check the availability and integrity of the selected disks. For example,/dev/dsk/c0t1d0:
    1. diskinfo/dev/rdsk/c1t1d2 -information about the disk
    2. dd if =/dev/rdsk/c1t1d2 of =/dev/null bs = 1024 k -read the contents of a disk, a
      search for "bad blocks".
  3. Prepare disks by creating them physical volumes (PV):
    pvcreate-f/dev/rdsk/c1t1d2 for slow disks, you can specify a larger timeout by adding the
    option "-t 180".
  4. Create a directory and a control file (group special file):
    1. mkdir/dev/vg01
    2. chmod 755/dev/vg01
    3. mknod/dev/vg01/group c 64 0x010000 the control file is always character type-c
      major (major) always-64 and younger (minor) is encoded 0xhh0000, where hh is a unique
      hexadecimal number of the VG
      .
    4. chown-R root: sys/dev/vg01
    5. chmod 640/dev/vg01/group
  5. Create A Volume Group:
    vgcreate/dev/vg01/dev/dsk/c1t1d2 if multiple disks, then scroll through the gap. 
    A set
     of parameters that can be set:
    -s 1-256 ( default  4 MB ) the size of the physical extent (pieces that are distributed)
    -p
     1-255 ( default 255 ) the maximum number of PV 
    -l 1-255 ( default 255 ) the maximum number of LV,
    -e 1-65535 (default, 1016  which corresponds to 4 GB) is the maximum number of physical
    extents on disk (physical). 
    Is very important and is set depending on the size of the volume
    by the formula: PV size < >/< > size of the extent.

    Does not change in the future, making it impossible to add more disks larger than the original,
    in the Volume Group
    .
  6. View VG settings command:
    - vgdisplay vg01
Now you can create the Logical volume: lvol1
  1. Reserve the name:
    - lvcreate-n lvol1 vg01
  2. Expand the LV to the desired size by selecting what disk in VG:
     lvextend-L 200/dev/vg01/lvol1/dev/dsk/c1t1d2 the key-L Specifies the size, in MB
     and the key-l specifies the size in extents. 
    Be careful.
  3. You can set additional parameters:
    lvchange-a y | n/dev/vg01/lvol1 -resolution | ban on the use of LV.
    lvchange-p r | w/dev/vg01/lvol1 -the right to "read-only" | " read-write when using a
      Logical Volume
    .
    lvchange-r y | n | N/dev/vg01/lvol1 -options for working with "bad blocks": move the
     "bad blocks" | does not move and I/O error | disables the mechanism for the use of disk array,
     for example.
  4. Show volume settings you can command: lvdisplay/dev/vg01/lvol1
You can create a Logical Volume in a single command lvcreate, immediately indicating the size,
but the above sequence of commands allows you to specify which drive of the VG will be a LV
This adds flexibility when creating.

Use Logical Volume lvol1:
  • As the file system:
    1. newfs-F vxfs/dev/vg01/rlvol1
    2. mkdir/data
    3. mount/dev/vg01/lvol1/data
    4. vi/etc/fstab -add a file system to mount after reboot.
  • As a swap area:
    1. swapon/dev/vg01/lvol1
    2. vi/etc/fstab -add to use after the reboot.
Before using read the documentation man:


12/13/2017

Logical Volume Manager (LVM) Part I Basics

LVM stands for Logical Volume Management. It is a system of managing logical volumes or file systems, that is much more advanced and flexible than the traditional method of partitioning a disk into one or more segments and formatting that partition with a filesystem.

This article primarily related to HP-UX operating system. 

However other operating systems may have their own peculiarities and nuances, but the basis is certainly one.

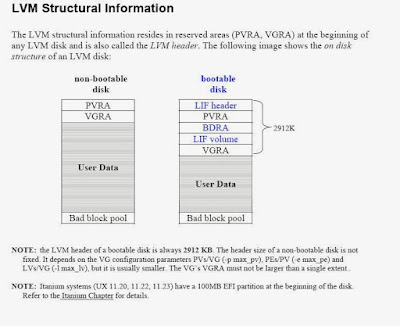
The disk that is part of the LVM has a specific structure and contains service information.

LVM structure: one or more disks are combined into a Volume Group (VG) within which
you can create one or more Logical Volume (LV),  between which to allocate the disk space of the volume group drives. On Logical Volume, create file systems or swap areas and specify mount points.

Useful directories and files: /DEV/DSK/CXTXDX and/DEV/RDSK/CXTXDX device files (block and raw) of the hard drives in the system /dev/vgxxx/group -Device file for Volume group Vgxxx /dev/vgxxx/lvxxx and /dev/vgxxx/rlvxxx -Logical volume (block and raw) files from the Volume Group VGxxx, /etc/lvmtab is a binary file that contains a list of the system's Volume Groups and a list of their hard drives (physical volumes). Some of the information from the file can be viewed by the strings command /etc/lvmconf - a directory with the backups of the Volume Group configuration files. is updated with the volume Group or Logical volume change commands or a single command - vgcfgbackup. A list of file systems and mount points used to automatically mount file systems at the start of the OS is a list of what is currently being installed. Information is used by the Mount/umount(2) and DF/BDF.

Logical volume manager
Добавьте подпись

9/28/2017

SAP Installation of SMD Agent With SWPM SP04

In the Diagnostics Agents page we have seen Diagnostic Agent installation-related Information and all key SAP Notes having all required detail. To summarize that info I would like to introduce some steps on how to install the latest Diagnostic Agent (includes SAP Host Agent). This Diagnostic Agent is compatible with any SP level of SAP Solution Manager 7.1. Also, you don't have to do a separate SAP Host Agent installation, if you have followed these steps. You can also activate the Agents On-the-fly feature with this Diagnostic Agent.


Note:  
When carrying out the below steps, make sure you have read and understood the Diagnostics Agent Installation Strategy PDF file attached with SAP Notes: 1365123  
            and sap note 1833501 for diagnostic agent installer version that is mentioned in the General Information section here: Diagnostics Agents. They explain the strategy, download procedure, and installation details.
Note: These steps have been performed on MS Windows server 2003 Enterprise Edition X64 bit encoding, so in your case, the file name could be different.

Download and extract the Installer media file.
To start the installation you need to first download the  Software Provisioning Manager 1.0 and their relevant kernel file. Once the correct files are downloaded have you need to unpack those.


Following these steps below you can download the Kernal media file.


Once the download is finished then you have to unpack these 2 files


Once you unpack those files then you have something like below,  Once you see these files available then you are ready to launch the installation.


After launching SAPINST.EXE  you will have to select this option below to go ahead.


Here you need to select the path of Kernal file been extracted in the same folder D:\download_basket\SWPM_SP04\Krnl_7.20_WIN__IA32__IA64__x64__SP04_


Note: here on this step 2 user gets created on OS level, you need to make sure on this server these users have admin-level or rights
 also they should have full Read + Write + Execute access to any folder and subfolder available on this server.


Note : This part below registering to the SLD is not advisable with the newer Solution Manager system so this step could be ignored and direct do to the next step Connection of diagnostic agent with Solution Manager. 

On this step if the user credential of target SLD system  is correct then this agent get register to the SLD. Here target SLD Could be any in your landscape usually you should connect this agent to the same SLD where your Managed system is reporting to using RZ70 or JAVA data supplier. This is optional step but it is strongly advise to connect agent with some SLD.


If you have SAP MMC Installed on the same server then you can see a new Instance of SMD Agent is available, should appear something like this below, from here you can start or stop agent.
 

To make sure if the SMD Agent is connected to the SLD detail you have provided before, just logon to SLD and navigate to this below screen here you will see an agent instance is available under Diagnostic Agent Class.


SAP Uninstallation of SMD Agent Using SWPM SP04

Переход к началу метаданных
In Installation of SMD Agent With SWPM SP04  we have seen how to carry out Installation of SMD Agent . Here we will see how to uninstall that using SWPM. You must delete a Diagnostics Agent instance only using SAPINST comes with SWPM  otherwise you might have problems with further installations on this host.  Before you go ahead with the removal of SMD Agent please make sure you have refre to the Section 4 of this SAP Note : 1833501  and Rule no # 6 of the attached document Agent Installation Strategy from SAP Note : 1365123

Rule No: 6 of SAP Note attched document 1365123

To remove a Diagnostics Agent instance installed for a specific hostname you must remove the JVM parameters described in the Introscope Setup Guide, which is available at service.sap.com/instguides.
Finally restart the Java Managed system to no longer run the Introscope Byte Code Agent
– The Managed System JVM parameters (to be removed) show that the Introscope Byte Code Adapter
executed inside the Managed System uses files from Diagnostics Agent directory structure: 
Xbootclasspath/p:D:/usr/sap/DAA/SMDA77/SMDAgent/applications.config/com.sap.smd.agent.application.wily/BytecodeAgent/ISAGENT.8.2.3.5-2011-01-
14/wily/connectors/AutoProbeConnector.jar;D:/usr/sap/DAA/SMDA77/SMDAgent/applications.config/com.sap.smd.agent.application.wily/BytecodeAgent/ISAGENT.8.2.
3.5-2011-01-14/wily/Agent.jar
Section 4 of SAP Note : 1833501
Make sure to respect the section(s) dealing with "Uninstalling Introscope Agents" here [http://wiki.sdn.sap.com/wiki/x/kgELE].
SAP Note 1259982 documents "Deleting a Diagnostics Agent Manually" for UNIX Operating Systems.
--------------------------------------------------------------------------------------------------------------------------------------------------------------------------------------------------------------------------------------
following above instruction  here below is the test case with steps , how would uninstall SMD Agent.

SWPM

SAP SMDA diagnostic agent

SAP inst  SWMP diagnostics gent uninstall

SAP inst  SWMP diagnostics gent uninstall

SAP inst  SWMP diagnostics gent uninstall

SAP inst  SWMP diagnostics gent uninstall

SAP inst  SWMP diagnostics gent uninstall

Note : If you have register this agent to any SLD then it is also advisable to remove the agent detail from SLD using remove button on this below SLD screen.

SAP diagnostics agents

Diagnostics Agents

Skip to end of metadata

Installation

General Information

Following documents are most relevant for installing and working with the Diagnostics Agent:
  • Refer to SAP Note 1365123 for the Diagnostics Agent installation strategy. 
  • Refer to SAP Note 1833501 for information on Diagnostics Agent installer versions, and for an overview of SAP Notes related to Mass Deployment / Unattended Installation.
  • Refer to SAP Note 1858920 and the latest Installation and Setup Guide for:
    • Information on how to access the Product Availability Matrix (PAM) for the Diagnostics Agent
    • Instructions on how to download the Installation Media
    • Instructions on how to patch the Installation Media
    • Details on supported kernels
    • Description of the unattended/silent installation mechanism
    • SMD Setup Script (smdsetup.bat/smdsetup.sh) documentation
    • More detailed installation instructions

Download Paths

Artifacts required for Diagnostics Agent installations can be downloaded as follows (for detailed instructions and alternative paths refer to latest Diagnostics Agent Installation and Setup Guides):
  • Go to http://support.sap.com/sltoolset
    • Product Availability Matrix/PAM:  search for "Product Availability Matrix"
    • Documentation:  System Provisioning  →  System Provisioning Scenarios →  Install a System using System Provisioning Manager →  Installation Option of Software Provisioning Manager 1.0 → Installation Guides - Standalone Engines and Clients → Diagnostics Agent  → download the guide for your  "Operating System Platform"
    • "installer":  System Provisioning → Download Software Provisioning Manager → SOFTWARE PROVISIONING MGR 1.0 → DOWNLOADS → → SWPM10SP*.SAR
  • For download of individual archives go to SAP Note 2253383
  • Check SAP Note 1858920 and the Product Availability Matrix for supported kernel versions

Recommended Reading

Which agent version should be used?

Please refer to the above mentioned Diagnostics Agent Installation Strategy SAP Note.

Where to install an agent?

Please refer to the above mentioned Diagnostics Agent Installation Strategy SAP Note.

Where to download the agent installation files?

Please refer to the General Information section above.

Connection Configuration

Refer to the installation procedures contained inside the Diagnostics Setup Guide.

Connection options

Before starting the installation make sure that you have identified which installation strategy you want to use. This means that you need to choose between the two following scenarios:
  • Direct Solution Manager Registration: In this scenario, the Diagnostics Agent establishes a direct connection to the Solution Manager system. Using this type of connection no SLD attachment is necessary especially since Solution Manager 7.1 SP05. Operational issues concerning Diagnostics Agents to Solution Manager connectivity can now be easily resolved via the “Non-authenticated Agents” list. (See Non Authenticated Diagnostics Agents).
    Prerequisite: Diagnostics Agent was connected to a Solution Manager 7.1 SP05 system at least once.
  • SLD Registration: In this scenario, the Diagnostics Agent registers itself into the production SLD assigned to the managed system on which the Diagnostics Agent will be installed. This scenario should be used especially if Solution Manager is not yet installed.

SLD Registration - Remotely Connect DIagnostics Agents  - Solution Manager 7.1

If you choose the "SLD Registration" strategy, the Diagnostics Agent should be visible using SOLMAN_SETUP transaction -> System preparation -> Step "Connect Agents". You must connect the relevant Diagnostics Agents to the current Solution Manager system in order to later be able to use them.
Agent reconnection may require waiting several minutes. It depends on settings which are set on the SMD Agent side. As soon as it detects that the association has been changed the SLD state is updated and the registration should proceed.

Direct Solution Manager Registration

If you want to perform the "Direct Solution Manager Registration" after the installation of the Diagnostics Agent, you will need to perform the smdsetup script action managingconf.
You can perform the direct connection to the solution manager in two ways, using the J2EE Message Server HTTP port (recommended). For more information about the smdsetup script refer to the Diagnostics Agent setup guide attached to the SAP Note for the most recent installer release (see SAP Note 1833501).
Example:
  • Connection by Message Server:
smdsetup managingconf hostname:"sapms://" port:"" [optional user:"<...>" pwd:"<...>"]
To run these script we will need to following information:
  1. Full qualified solution manager hostname.
  2. J2EE Message Server HTTP Port, like 81.
  3. Diagnostics Agent system user: For more information about these user check the User Administration Guide.
  4. Diagnostics Agent system user password.
Where to find the J2EE Message Server HTTP port.
  • J2EE Message Server HTTP: This port is usually 81XX (where xx is the SCS instance number: /usr/sap//SCS).
Make sure that you address the Solution Manager Java SCS Message Server with the above mentioned port number. URL.  Enter in the following URL: http://:/msgserver/text/logon
This shall display a P4 and/or P4S line, like here:


Having all necessary information, you have to perform the smdsetup script to connect the Diagnostics Agent to the Solution Manager system:
   1. Open a prompt command and navigate to the script folder inside of the agent path: usr/sap//SMDAXX/script
   2. Run the smdsetup script as the following examples:
  • Connection by Message Server:
     - smdsetup managingconf hostname:"sapms://solman.full.qual.host.name" port:"81XX" user:"SMD_ADMIN" pwd:"XXXXXXXX"
  •  Afterwards, the command should finish successfully:
Then check at the “Agent Administration” if the agent is connected to the Solution manager. If the agent does not connect to the Solman system check the SMDSystem log for error. This log file can be found into the log folder at the agent path.
IMPORTANT: Note that SAP recommends to use the connection via the Solution Manager Java SCS Message Server. Trying out a direct connection via the P4 or P4S port, is only relevant in some very specific situations.

Connect the Diagnostics Agent to Solution Manager Using SSL 

How to Configure the Different Ciphers on the Diagnostic Agent

Please refer to SAP Note 2849162.

Frequently Asked Questions and Trouble Shooting

Please refer to the FAQ Diagnostics Agent.

Popular Posts